
When reloading, precision is key, and two critical factors are the seating depth (Seating Depth) and the overall cartridge length (COAL). These directly influence pressure, muzzle velocity, and accuracy. Here are the main points:
- Measure CBTO instead of COAL: CBTO (Cartridge Base to Ogive) provides more precise values as it eliminates variations at the bullet tip.
- Optimize jump distance: Start with a jump of 0.015 inches and test in increments of 0.005 inches to find the best accuracy.
- Use tools: High-quality micrometer seater dies and bullet comparators are essential for precise adjustments.
- Consider magazine length: Adjust the COAL to ensure cartridges fit in the magazine without compromising accuracy.
- Keep powder charge constant: Only vary the seating depth to obtain clear results.
Conclusion: Precise measurement methods like CBTO and systematic testing significantly improve accuracy. High-quality tools and regular adjustments are crucial.
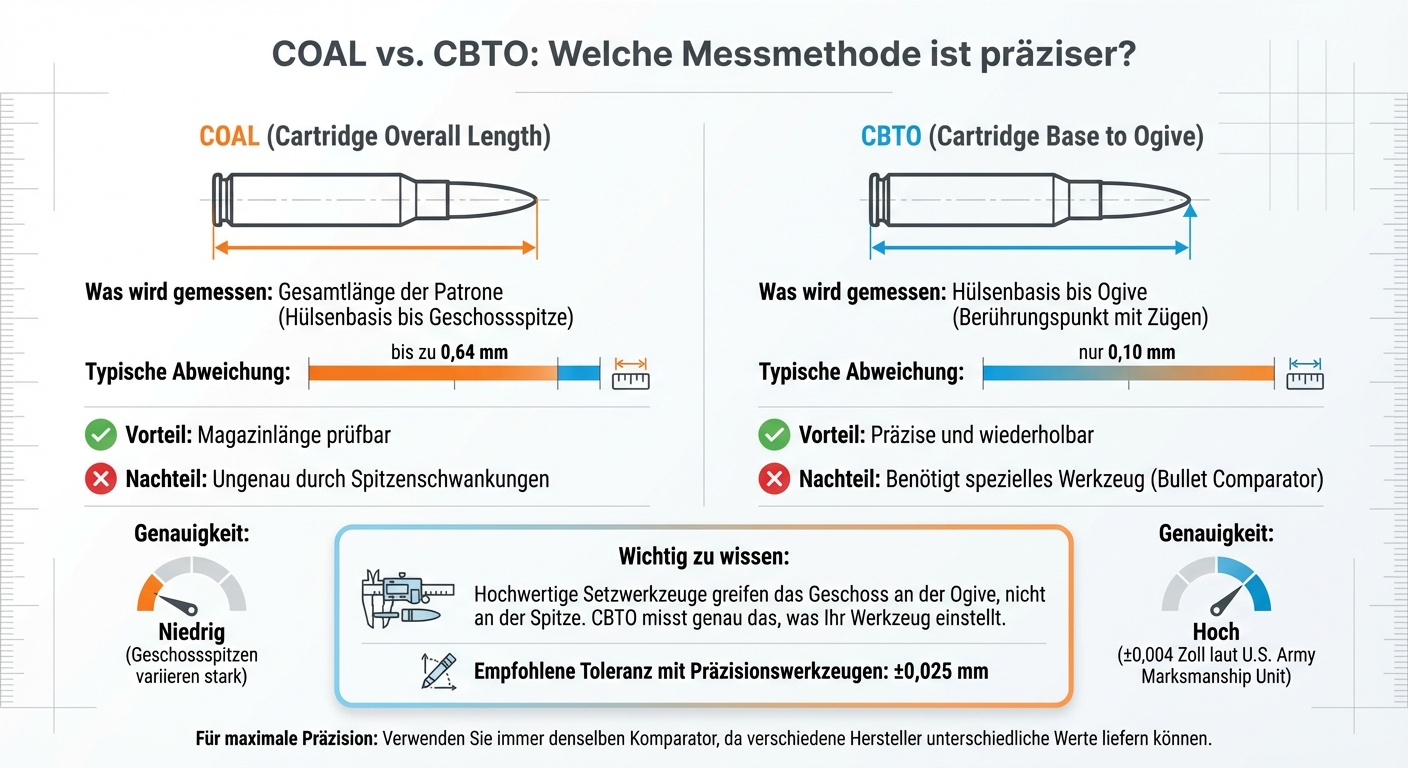
COAL vs CBTO Measurement Methods Comparison - Precision in Reloading
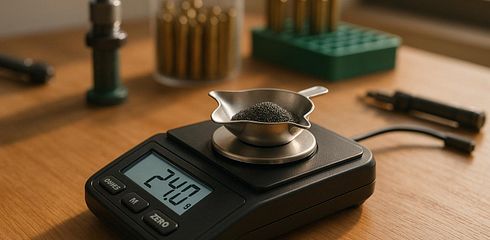
Using the Hornady Comparator and OAL gauge to adjust bullet depth

1. Measure CBTO instead of COAL
As mentioned, measuring CBTO (Cartridge Base To Ogive) is a more accurate alternative to traditional COAL measurement (Cartridge Overall Length). CBTO measures the distance from the case base to the ogive – the point where the bullet touches the rifling. In contrast, COAL refers to the total length of the cartridge, including the bullet tip, which can vary in shape and length by up to 0.64 mm. CBTO, on the other hand, has only minor deviations of about 0.10 mm [6].
Why CBTO is more sensible: High-quality seating tools engage the bullet at the ogive and not at the tip. This means that the ogive is already the reference point when you set the seating depth [1]. A CBTO measurement accurately reflects what your seating tool is actually setting. With precise bullets and tools, tolerances of ±0.025 mm can be achieved.
This is how the measurement works: For CBTO measurements, you need a digital caliper with a bullet comparator. This stops at a defined point on the ogive [1][6]. It is important that you always use the same comparator, as tools from different manufacturers are not standardized and can provide different values [1].
| Measurement Method | Typical Deviation | Advantage | Disadvantage |
|---|---|---|---|
| COAL | up to 0.64 mm | Magazine length check possible | Inaccurate due to variations at the tip |
| CBTO | only 0.10 mm | Precise and repeatable | Requires special tool |
A crucial point: The seating depth should not depend on the bullet tip [1]. The U.S. Army Marksmanship Unit has found that CBTO measurements often have a deviation of only about 0.004 inches [6].
These precise measurements are the foundation for all further optimization steps.
2. Start with a 0.015 inch jump for hybrid bullets
Hybrid bullets like the Berger 105 Hybrid combine the strengths of two ogive designs: They merge the high ballistic coefficient (BC) of a secant ogive with the seating depth tolerance of a tangent ogive [3][4]. This makes them less susceptible to variations in seating depth than conventional VLD bullets (Very Low Drag).
Based on the precise CBTO measurement from section 1, a jump of 0.015 inches (approximately 0.38 mm) is an ideal starting point. This value falls within the optimal range of 0.010 to 0.020 inches and provides a good balance between precision and a safety margin to avoid pressure spikes. Because once the bullet touches the rifling, chamber pressure can increase significantly [3][4]. Even factory match ammunition can have CBTO deviations of up to 0.008 inches within a box [4]. With a jump of 0.015 inches, you ensure that even the longest cartridges in a batch do not inadvertently touch the rifling.
An additional advantage of this distance is that the bullet is optimally centered in the barrel upon ignition. This minimizes the so-called "bullet yaw" and improves precision [3]. Glen Zediker, author of several technical books on reloading, explains:
“Most competition rifles will shoot best with bullets seated somewhere between jammed 0.020 and jumping 0.020.” [3]
Important: This precise starting point is less tolerant of barrel erosion. Precision cartridges like 6 mm Creedmoor or 6 Dasher show an increase in jump of 0.008 to 0.014 inches after about 200 shots due to barrel erosion [4]. Therefore, it makes sense to also try larger jump distances after the initial tests. In the next section, you will learn how larger jump distances affect precision.
3. Test in 0.015 inch increments to find precise nodes
Based on the 0.015 inch jump from section 2, you can begin systematic testing in exactly this increment to identify precise point zones. These zones, typically between 0.030 and 0.040 inches wide, can be efficiently covered using this method. The range from 0.000 to 0.150 inches is thoroughly examined without overlooking a potentially optimal area [3]. At least one of your test groups will surely fall within the optimal range.
However, it is not just about the smallest group, but rather about a broad and stable range that is also forgiving. Due to the erosion of the rifling in the barrel – about 0.004 to 0.007 inches per 100 shots – the jump can increase by up to 0.008 to 0.014 inches in a 200-shot competition [4].
An example of this method is provided by Mark Gordon from Short Action Customs. In April 2020, he conducted extensive tests with Berger 105gr hybrid bullets. He tested ten different rifle configurations with jump distances from 0.000 to 0.095 inches in 0.005 inch increments. The result? The tightest vertical spreads occurred at jump distances of 0.070 to 0.080 inches. Interestingly, jumps under 0.030 inches were particularly susceptible to point shifts caused by barrel erosion [4].
Wade Stuteville, gunsmith and PRS champion, describes it this way:
“Usually there is another spot way back that is much wider and more forgiving... you might be able to move the jump from 0.050 to 0.100” and it shoots good everywhere.” [4]
For precise results, you should always work with a constant powder charge. This way, you can isolate and clearly interpret the effects of seating depth [4]. In the next step, you can further optimize the found node by fine-tuning by ±0.002 inches.
4. Fine-tuning with ±0.002 inch adjustments
Once you have identified the optimal range with 0.015 inch increments, it's time for fine-tuning: ±0.002 inch adjustments ensure maximum precision. Mike Ratigan, a member of the Benchrest Hall of Fame, puts it succinctly:
“Now and then, 2-3 thousandths change in seating depth can make the difference between average and peak accuracy.” [3]
These micro-adjustments help to perfectly synchronize the moment of bullet exit with the vibration cycle of the barrel. Bob Blaine from Berger Bullets explains the process this way:
“We are using the bullet seating depth to tune for an optimum accuracy node in the barrel's vibration cycle. The goal is to have all bullets exit the barrel in the same location in its vibration cycle!” [2]
To achieve this precision, high-quality tools are indispensable.
Use a micrometer seater die and a bullet comparator to measure the CBTO (Cartridge Base to Ogive) accurately. CBTO measurements are significantly more reliable than COAL (Cartridge Overall Length) as they eliminate variability in bullet tips. This way, you precisely adjust the bullet exit to the vibration cycle of the barrel and minimize potential sources of error.
Especially in tests at longer distances, such as 600 to 1,000 meters, differences in seating depth become clearer through vertical spreads [4]. You should also keep an eye on the effects of barrel erosion. Regularly check your settings – about every 100 to 200 shots – as the rifling can wear down by 0.004 to 0.007 inches per 100 shots [4].
With careful monitoring and precise fine-tuning, you can achieve peak performance, even at long distances.
5. Use Ultra-Micrometer Seater Dies for precise adjustments
With ultra-micrometer seater dies, you can adjust the seating depth in ±0.002 inch increments (approximately 0.05 mm). These tools allow you to make adjustments with an impressive accuracy of 0.001 inch increments (approximately 0.025 mm). This lays the foundation for precise and consistent reloads.
A key advantage of these tools is that they engage at the ogive of the bullet – an area that has a constant shape and thus avoids variations at the bullet tip. Since bullet tips can have deviations of up to 0.025 inches (approximately 0.64 mm), the ogive is the more reliable point for consistent results [1]. Bryan Litz from Berger Bullets emphasizes this strongly:
“If you have a CBTO dimension that varies but your COAL dimension is tight (within +/- .002) then it is most likely that your bullet is bottoming out inside the seater cone on the bullet tip. This is very bad and is to be avoided.” [1]
The precise scale of the ultra-micrometer seater dies allows reproducible settings, even when using different bullet batches or when your barrel is slightly altered due to erosion. This way, you can achieve a CBTO variance of less than ±0.001 inch [1].
Ensure that the seater die cone does not rest on the bullet tip. If your COAL (Cartridge Overall Length) is constant but the CBTO (Cartridge Base to Ogive) varies, this could indicate that the die is pressing on the uneven tip instead of the ogive [1]. Precise control of the seating depth also ensures consistent case volume. This, in turn, leads to consistent pressure and uniform muzzle velocities – essential for precise shooting at long distances. With these settings, you perfectly optimize your reloads for your barrel.
6. Adjust COAL to magazine length
The length of the magazine sets clear limits on your reloading freedom. If your preferred seating depth results in a COAL (Cartridge Overall Length) that does not fit in the magazine, you have two options: Either you load each cartridge individually by hand, or you seat the bullet deeper to make it magazine-compatible [1][6].
However, seating the bullet deeper has technical consequences. It reduces the case volume, which, with a constant powder charge, increases the initial pressure and muzzle velocity. Therefore, you should adjust the powder charge accordingly to avoid unwanted pressure spikes [1][9]. This adjustment becomes particularly important as the barrel wears and loses more material, causing the COAL to hit the magazine limit.
Another problem arises when shooters try to set the bullet as close to the rifling as possible to optimize precision. This can result in the COAL becoming so long that the cartridge no longer fits in the magazine [2][10]. Cal Zant from PrecisionRifleBlog.com aptly describes this dilemma:
“Many people start with their COAL almost maxed out in their magazine, and as their chamber throat starts to wear they are forced to choose between loss of accuracy from not being able to seat the bullet close to the rifle lands, or seating the bullet too far out to fit in the magazine.” [10]
To determine the correct magazine length, measure the internal length of your magazine with calipers. Then subtract a buffer of 0.010″ to 0.020″ to ensure reliable feeding [1][10]. If your ideal seating depth does not fit in the magazine, test the maximum possible COAL and work your way down in 0.005″ increments until you find a new precision node [2][6]. Alternatively, you might consider magazines without a front plastic insert, as these often provide more space for longer cartridges [10].
sbb-itb-1cfd233
7. Keep the powder charge constant during tests
To determine the optimal seating depth, you should only vary the seating depth while keeping the primers, cases, and powder charge unchanged. Only then can you ensure that changes in seating depth actually affect group dispersion [3][9]. Any adjustment of the seating depth changes the volume of the case: If the bullet is seated longer, more internal space is created, which, with a constant powder charge, leads to lower pressure and lower muzzle velocity [1][7]. Conversely, if you seat the bullet deeper, the pressure increases accordingly. Bryan Litz, ballistic expert at Berger Bullets, describes it this way:
“For a given powder charge, there will be less pressure and less velocity produced because of the extra empty space [when seated long].” [1]
If you change both the powder charge and the seating depth simultaneously, it becomes impossible to determine which factor influences precision. Both barrel harmonics and bullet velocity would change, distorting the results [7]. By applying the fundamentals of CBTO measurement, you can ensure that the variables remain cleanly separated.
Start by determining a stable powder charge that consistently produces good groups. Methods like Optimal Charge Weight (OCW) can be helpful in this [3]. Only after that do you test different seating depths at exactly this powder charge to find the precision node [3][9]. Glen Zediker, author of Top-Grade AMMO, summarizes it well:
“Determining the bullet seating depth a rifle likes best is normally 'fine tuning' that entices any stray holes to relocate on into the group.” [3]
8. Check bullet alignment with a concentricity gauge
After you have completed the fine-tuning of the seating depth, the next step is to check bullet alignment. Why? Even if the ideal seating depth has been found, a misaligned bullet can significantly impair precision. This is where the concentricity gauge comes into play: It measures the so-called bullet run-out – that is, how much the bullet deviates from the centerline of the cartridge case [11]. This step complements the previous optimizations and is just as important as the exact seating depth.
Bob Kohl from Sinclair International puts it succinctly:
“If the case isn't properly concentric and the bullet isn't properly aligned down the center of the bore, the bullet will enter the rifling inconsistently.” [11]
To perform the measurement correctly, place the finished loaded cartridge on the rollers of the concentricity gauge. Position the dial indicator at the ogive – that is, at the transition from the case to the bullet surface – and not at the uneven tip [6]. Slowly rotate the cartridge 360°. The Total Indicator Reading (TIR) indicates how large the deviation is: Values under 0.025 mm are considered optimal, while values over 0.1 mm are problematic [11]. Especially benchrest shooters strive for precise values in this range [3].
Common causes of run-out and tips for reduction
Run-out often occurs due to:
- Uneven case neck thickness
- Flex in the press head
- Incorrectly set seating dies [11]
A simple method to minimize run-out is to initially seat the bullet only halfway into the case. Then rotate the case 180 degrees and fully seat the bullet. This technique can significantly reduce the deviation [11]. If your die still regularly produces high values, the problem may already lie in the calibration. A misaligned expander ball during the calibration process can prevent any subsequent correction [11].
Why concentricity is crucial
A misaligned bullet can not only impair precision but also damage the bullet jacket when it has to straighten itself in the barrel [11]. Tony Boyer, multiple benchrest world champion, explains:
“When shooting with the bullet into the lands, the lands themselves straighten the bullet without forcing over-travel.” [3]
Especially with a larger jump – that is, the distance the bullet travels before reaching the rifling in the barrel – correct concentricity is crucial. Without precise alignment, the bullet enters the barrel unevenly, which can lead to unpredictable trajectories.
9. Understand the risks of seating close to the lands
After optimizing your seating depth, it is important to also know the potential risks of positioning the bullets too close to the lands. While this method can improve centering and reduce lateral deviations (bullet yaw), it carries some dangers. Gunsmith and author Nathan Foster explains:
“The projectile may arrive at the lands slightly off center if it has to travel a long way. In this instance, having the bullet close and concentric to the bore can help minimize potential bullet yaw during ignition.” [3]
A bullet that touches or is pressed into the lands can significantly increase chamber pressure. Dr. Harold Vaughn warns:
“Seating the bullet in the case so that it contacts the rifling in the throat also increases the peak chamber pressure, which is not desirable.” [3]
This pressure increase occurs because the bullet must work against the resistance of the lands immediately without a free run. When switching from a jump (distance to the lands) to a jam (direct contact with the lands), it is crucial to reduce the powder charge accordingly [3]. Another risk is that a bullet seated too close may get stuck in the lands when you unload the cartridge. In such a case, the bullet could remain stuck while the case releases, causing powder to enter the bolt system [3].
Additionally, this method is prone to erosion. Especially with precision calibers like the 6 mm Creedmoor, the lands erode by 0.004 to 0.007 inches (approximately 0.1 to 0.18 mm) per 100 shots [4]. This erosion can lead to an increase in jump due to barrel wear of up to 0.014 inches (0.36 mm) during a competition – enough to impair the precision of your load [4].
A safe approach is to start with a jump of 0.020 inches (approximately 0.5 mm) and systematically test the results. Regularly check for erosion and adjust the seating depth every 100–200 shots to ensure consistent precision [4][6].
10. Find reloading equipment and components on Gunfinder
Once the technical foundations are in place, the right tools will help you get the most out of your settings. On Gunfinder, you will find specialized dealers like Wiederladewelt24, Jagdwelt24, and Waffen Schrum [12]. The platform serves as a combination of marketplace and search engine for offers from various providers.
In the "Ammunition" category, there is a section for "Reloading," where you can specifically search for precision tools [12]. Terms like Comparator, OAL Gauge, or Micrometer Seater Die will lead you directly to high-quality tools from well-known brands [8]. Bullet comparators are an indispensable tool, especially for CBTO measurements [6].
A major advantage of the platform: You can compare prices between different dealers. With the integrated wishlist, you can keep an eye on expensive precision tools like ultra-micrometer seater dies and will be notified of price changes [12]. In the outlet section, special offers await you, allowing you to purchase high-quality reloading equipment at a lower price. This way, your reloading setup remains not only precise but also cost-effective.
In addition to precise seating settings, brand products like precision bullets from Barnes, Hornady, or RWS as well as suitable cases contribute to your perfect target image [12] [14]. Gunfinder combines marketplace and technical information, allowing you to research technical articles before purchasing and select the appropriate equipment for your needs [13].
Comparison Table: Results of the Jump Distance Test
A table like this makes it easier to evaluate your own test results and determine the ideal jump distance for your setup. Here are specific test results for various bullet types. This data can help you better categorize your own tests.
| Bullet Type | Tested Jump Range | Recommended "Sweet Spot" | Vertical Dispersion (ES) | Special Features |
|---|---|---|---|---|
| Berger 105 gr Hybrid | 0.000" – 0.095" | 0.070" – 0.080" | Tightest spread over 10 rifles | Less stable at 0.000"–0.010" [4] |
| Hornady 147 gr ELD-M | 0.000" – 0.095" | 0.050" – 0.065" | 0.26 MOA at 600 yards | Very consistent across different powder charges [5] |
| Tubb 115 gr DTAC | 0.000" – 0.095" | 0.075" – 0.085" | 0.3 MOA vs. 0.8 MOA at short jump | Very insensitive from 0.070" jump [5] |
| Lapua 300 gr Scenar (.338) | Not specified | ~0.100" | 19% accuracy increase | Tested over 2,500 shots in 50 rifles [4] |
A jump range of 0.010" to 0.020" can also maintain precision even with barrel wear. Scott Seigmund from Accuracy International explained:
“The results even surprised me with an increase in accuracy of 19% with the 300 grain bullets jumping about 0.100.” [4]
The results show a clear trend: Larger jump distances between 0.040" and 0.100" often offer more tolerance than very tight settings. For example, the vertical dispersion of the 115 DTAC worsened from 0.3 MOA to 0.8 MOA when the jump was reduced from 0.075"–0.085" to 0.025"–0.035" [4].
A stable plateau in your measurements is a good sign. Multiple good results in a row indicate a reliable sweet spot that remains consistent even with barrel erosion. Use these insights to further refine your test series and enhance the precision of your setup.
Conclusion
Optimizing seating depth and COAL requires accuracy, a systematic approach, and the right tools. The most important tip is: Always measure CBTO instead of COAL, as this provides more consistent and reproducible results. This method forms the basis for precise fine-tuning.
A good starting point is a jump distance of 0.010″ to 0.015″, which you vary in increments of 0.005″ while keeping the powder charge constant [3][8]. Mike Ratigan, a member of the Benchrest Hall of Fame, sums it up:
“Now and then, 2-3 thousandths change in seating depth can make the difference between average and peak accuracy.” [3].
Especially at demanding distances, this fine-tuning pays off.
Invest in tools like micrometer seater dies, bullet comparators, and concentricity gauges to achieve consistent results. Also, ensure that the optimized cartridge length fits in your magazine – especially for hunting ammunition, this is a crucial factor [1][8].
Data shows that moderate jump distances offer higher tolerance to barrel erosion. A stable precision plateau is often more durable and robust than a short-lived peak value that quickly diminishes due to wear.
Everything you need for your setup – from Hornady and Berger bullets to micrometer seater dies and other measuring instruments – can be found at Gunfinder. This platform simplifies the search for specialized equipment by aggregating offers from various dealers. This way, you can quickly and easily find the right tools to further optimize your setup [12][15].
FAQs
Why is the CBTO measurement more precise than the COAL measurement?
The CBTO measurement (Cartridge Base to Ogive) offers higher precision as it determines the position of the bullet ogive in relation to the rifling in the barrel. This method is crucial for determining the ideal cartridge length for maximum accuracy and reproducible results.
In contrast, the COAL measurement (Cartridge Overall Length) only measures the total length of the cartridge from the bullet tip to the base of the cartridge. Since the bullet tip can vary in shape, COAL is less suitable for precisely adapting the cartridge to the chamber or barrel geometry.
How does the jump distance affect shooting precision?
The jump distance (Bullet Jump) plays a crucial role in shooting precision. It refers to the distance a bullet travels before it touches the rifling and lands in the barrel. When the jump distance is optimally set, the bullet is guided evenly and stably through the barrel – significantly improving accuracy.
However, if the jump distance is too large, it can lead to uneven powder burning and larger dispersion circles. Conversely, a jump distance that is too small makes loading more difficult and can impair magazine function. Therefore, it is particularly important to carefully adjust the jump distance, especially when precision is the top priority. Experiment with different settings to determine the ideal combination for your rifle and ammunition.
What tools do you need for precise reloading?
For precise reloading, you need some essential tools to accurately determine and adjust the seating length of the bullets. A COAL gauge (Cartridge Overall Length) is particularly helpful, as it allows you to measure the total length of the cartridge accurately and establish the optimal position of the bullet in the chamber. Equally important is a high-quality caliper to reliably check measurements and achieve reproducible results.
Many experienced reloaders also use a ogive gauge to adjust the seating length even more precisely to the specific geometry of the chamber. These tools play a central role in enhancing the precision of your ammunition while ensuring flawless function in the magazine. With the right equipment, you can significantly optimize the performance and accuracy of your loads.