A Red Dot often makes shots easier and faster, but not necessarily more accurate by itself. When I want to hit cleanly with a red dot sight, dot size, mounting, zeroing, brightness, and my technique are what really count.
In short:
- At short to medium distances, a Red Dot shows its strengths.
- 2 MOA covers about 5.8 cm at 100 m.
- For rifles, usually 1–2 MOA is suitable, for pistols often 3–6 MOA.
- A loose mount can shift the point of impact.
- In rain, snow, and bright sunlight, the target image can suffer.
- A Red Dot often clearly shows trigger errors and grip problems.
If I break it down to the essentials, it comes down to these 5 points:
- Choose the right dot size
- Mount and zero it cleanly
- Adjust brightness appropriately
- Work with both eyes open
- Train regularly dry and sharp
| Point | What I would remember |
|---|---|
| Dot size | Small for more distance, larger for close range |
| Mounting | Secure, low, and fitting to the weapon |
| Zeroing | In small steps, with the later ammunition |
| Technique | Look at the target, not stare at the dot |
| Weather/Light | Do not set the dot too bright |
Bottom line: A red dot sight can help a lot. But only with a clean setup and clean shooting does the precision come that I want to see on the range or in the field.
What is the best Red Dot? | Samantha shows her IPSC setup & gives tips for precision & speed
sbb-itb-1cfd233
Accuracy Limits of Red Dot Sights
The smaller the target and the further away it is, the more dot size and shooter errors count for the hit pattern. The precision limit of a red dot sight depends mainly on three things: dot size, parallax, and your shooting technique.
Dot Size, Parallax and Target Image
The dot size in minutes of angle, or MOA, indicates how finely you can aim. A 2-MOA dot covers about 5 cm of the target at 91 meters [2]. This already shows quite well where the journey is headed: For rifles and more distance, a 1–2-MOA dot usually fits better. For pistols and at short distances, 3–6 MOA are often the more suitable choice [1][2][6].
Parallax can shift the point of impact if your eye is not properly aligned behind the sight. This becomes noticeable more quickly with cheaper models - directly on the target [1][6].
Human Error versus Optics Performance
In practice, it is usually not the sight that limits precision, but the person behind it. A Red Dot reduces aiming error because it simplifies the three levels - rear sight, front sight, and target - to just two: dot and target [1][7]. This often makes aiming clearer and more direct.
However, what the sight does not compensate for:
The Red Dot often just makes these errors more visible. When grip, presentation, and trigger pull are clean, a Red Dot can allow for more precise shooting in many cases.
That’s why the right setup also has a noticeable impact on usable precision.
Setup and Zeroing: Mounting for Repeatable Precision
A Red Dot is only precise if the mount is secure. Even before the first shot, it is clear whether the point of impact will remain stable later or not.
Mounting Height, Position, and Stable Mounting
The mounting height has a direct impact on how quickly you can get the dot into your field of view. A low sight line often helps to find the dot quickly. A high mount can make acquiring the target somewhat slower.
For AR platforms, two variants are particularly common: Absolute Co-Witness aligns the dot directly with the front and rear sights. Lower 1/3 Co-Witness positions the dot slightly higher and provides a freer field of view [7]. For pistols, the general rule is: If the sight is positioned further back, you often find the dot faster during presentation [5].
A classic issue with point of impact problems is loose mounting screws. If the zero point "disappears," it is often due to this. Therefore, tighten all screws to the specified torque and check them regularly. Recoil and temperature fluctuations can loosen them over time [8].
Once the mount is secure, it's time to zero.
Zeroing Step by Step with MOA Corrections
A laser bore sighter helps with rough alignment. After that, zeroing works best in clear steps:
- Shoot the first group: Three shots from a stable rest at 25 m for rifles or 10 to 15 m for pistols [8].
- Measure point of impact deviation: Measure the distance between the point of impact and the point of aim in centimeters.
- Convert and correct MOA: At 100 m, 1 MOA is approximately 2.9 cm [8]. If the group is 5.8 cm too high, you correct the elevation by 2 MOA down. Then shoot again and only adjust further if necessary.
- Confirm: Shoot three more shots and check if the point of impact is now correct.
Note the final adjustments. This saves time and nerves later. Especially with a change of ammunition, the point of impact can shift. Therefore, you should always zero with the exact ammunition that you will use later [8].
Setup for Weapon and Purpose
Depending on the weapon and use, not every design fits equally well. A closed tube sight usually withstands moisture, dirt, and harsh conditions better. An open reflex sight shows its strengths more when weight and compact design matter.
| Design | Strengths | Typical Use |
|---|---|---|
| Tube (closed) | Robust, weatherproof | Rifle, shotgun, rough conditions |
| Open reflex sight | Light, compact | Pistol, competition |
| Direct mounting (milled slide) | Maximum stability | Service, competition, pistol [5] |
| Adapter plate | Flexible, optical change possible | Modular platforms [5] |
With pistols, you should pay special attention to the correct footprint. Trijicon RMR, Shield RMSc, and Aimpoint Acro are not compatible with each other [4]. The wrong adapter makes the mounting height unnecessarily larger - and that can make finding the dot noticeably harder.
Shooting Technique and Training: Better Hits with the Red Dot
Once the sight is properly mounted and zeroed, it comes down to your shooting technique. When the mounting and zero point are set, it is primarily your stance that determines where the shot lands.
Basic Technique for Rifle, Shotgun, and Pistol
Focus your gaze on the target, not on the dot. The dot is just the reference.
Keep both eyes open. For the rifle, a consistent cheek weld helps. For the pistol, you need a stable, identical grip. This way, the dot appears in the same spot with every stance. If the dot shifts to the side when you pull the trigger, it directly indicates a trigger error. This is what makes the Red Dot an honest tool when you want to train trigger control and clean follow-through.
This is where dry training and clean shot groups begin to do their job.
Dry and Live Fire Exercises for Measurable Progress
Dry training ensures that your stance and target acquisition happen automatically. Bring the weapon into position: slowly, evenly, and the same every time. Only when the movement is reliably repeatable do you increase the speed.
When shooting live, you start with slow groups at 25 to 50 m [9]. Keep track of each group. Note the hit location and spread, as you will only improve if you recognize patterns. After that, you move to 100 m, then to target transitions and exercises under time pressure [3].
This way, progress can be well tracked:
| Training Phase | Method | Focus |
|---|---|---|
| Foundation | Dry firing, wall exercises | Stance, point acquisition [4] |
| Precision | Slow groups at 25–50 m | Trigger, measuring spread [9] |
| Increase | Groups at 100 m | Point of impact, distance |
| Dynamics | Target transitions, timed exercises | Speed, target transitions [3] |
Choosing the right Red Dot and using it in practice
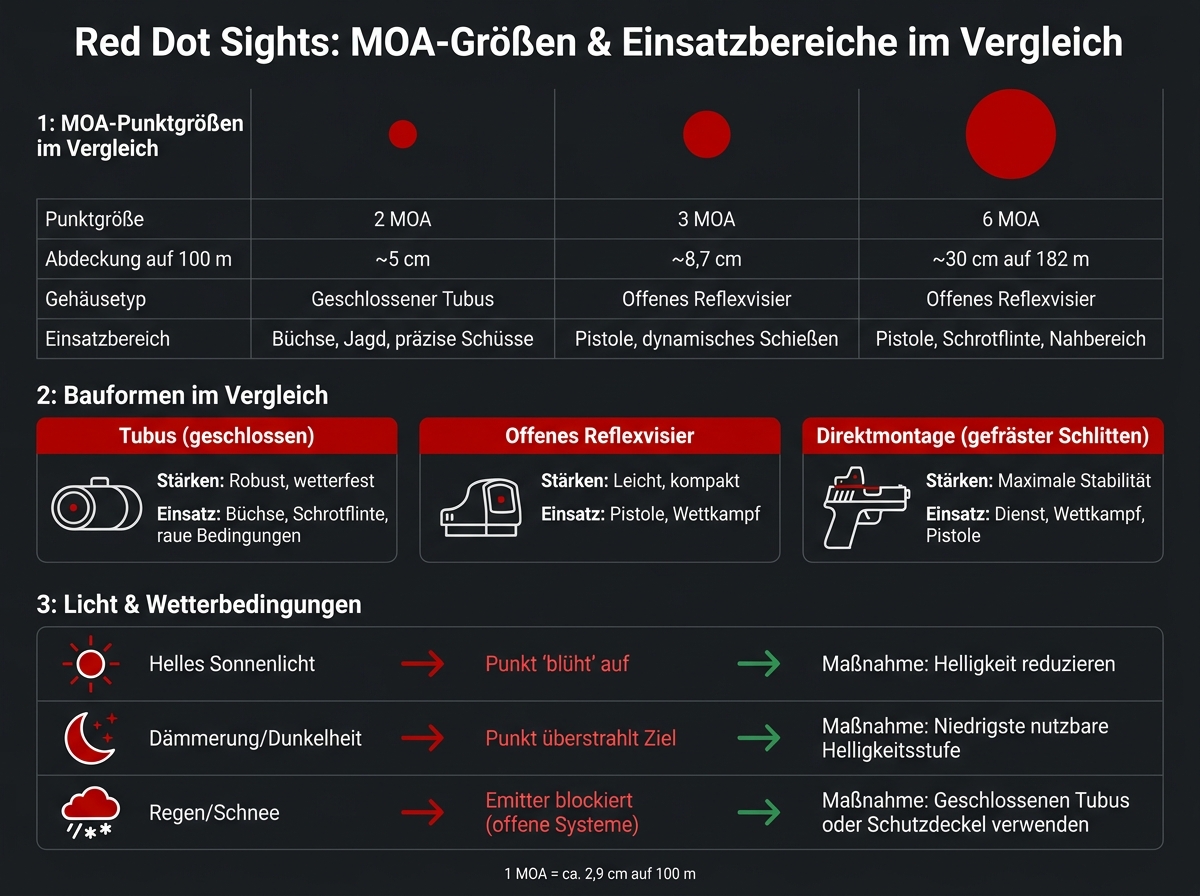
Red Dot Sights: MOA sizes, designs & areas of application compared
What you should check before buying
Before purchasing, you should align dot size, weapon type, and intended use clearly. This is where it is decided whether the optics, weapon, and your shooting performance fit together. After that, the models mainly differ in dot size, design, and operation.
Also check the footprint, optics-ready status, and necessary mounting height. Common systems like Trijicon RMR, Shield RMSc, and Aimpoint Acro do not fit interchangeably [4][5].
The battery access also makes a big difference in everyday use. A side or top access is often the better choice because you can change the battery without removing the sight. Practical is also Shake-Awake, so the sight is ready to go immediately [1][4][10].
If you have astigmatism, the dot may appear distorted. On paper, a model often sounds good. In the end, however, what matters is how the dot looks to your eye. Therefore, test the sight personally before purchasing [4].
| Dot Size | Housing Type | Application Area | Note |
|---|---|---|---|
| 2 MOA | Closed Tube | Rifle, hunting, precise shots | 2 MOA covers about 5 cm at 100 m [2] |
| 3 MOA | Open Reflex Sight | Pistol, dynamic shooting | Good balance of speed and precision |
| 6 MOA | Open Reflex Sight | Pistol, shotgun, close range | 6 MOA covers about 30 cm at 182 m [10] |
Even a very good sight does not automatically shoot precisely. The brightness must match the environment. Otherwise, a clean dot can quickly turn into a distracting light spot.
Light, weather, and field conditions that affect precision
What appears clear on the shooting range can become immediately less readable outside in sunlight, rain, or snow. This is often underestimated.
In bright sunlight, the dot can appear to "bloom." It then looks larger and blurrier than it actually is. The simple countermeasure: reduce brightness until the dot appears clear and sharp again [10]. In twilight or low light, the opposite is almost true: choose the lowest setting that you can still see well, so the dot does not overpower the target [2].
For hunters in Germany, rain and snow are not marginal topics, but everyday occurrences. Open reflex sights have an exposed emitter. If it is blocked by water, dirt, or snow, the dot disappears [4]. Closed tube systems are usually the safer choice under such conditions. If you still use an open system, lens covers and a quick functionality check before each use can help. Anti-fog agents and clean lens maintenance are also advisable [4].
| Condition | Effect on Precision | Recommended Measure |
|---|---|---|
| Bright sunlight | Dot "blooms", appears larger and blurry | Reduce brightness [10] |
| Dusk / Darkness | Dot overexposes the target | Select the lowest usable brightness level [2] |
| Rain / Snow | Emitter blocked (open systems) | Use closed tube or lens cover [4] |
Conclusion: The decisive factors for precise shooting with the Red Dot
When selection and use match, posture, light, and maintenance remain the key points that determine precision. Choose dot size, housing, and brightness according to weapon, distance, and weather. Then, it mainly comes down to clean technique.
FAQs
Which zero point is suitable for my use?
The suitable zero point depends on use, distance, weapon, ammunition, and your personal preference. For short to medium distances up to 100 meters, 25 to 50 meters are usually sensible. This often ensures a flat trajectory and good hit accuracy.
For longer distances over 100 meters, 100 meters is often the better choice. In dynamic situations, 25 to 50 meters are often more practical, as they work well in close and medium ranges. Check the zero point regularly and readjust if necessary.
How do I recognize mounting or parallax errors?
Align the Red Dot Sight on a target at a known distance, for example at 25 meters, and then change your eye position. If the dot shifts in the field of view while the target remains in the same position, this indicates a parallax error.
Also take a close look at the mounting. The sight should sit firmly and without play on the weapon. A clean adjustment of the dot and regular checks of the mounting screws also help to detect mounting errors early and prevent them from occurring at all.
When is a closed red dot worth it?
A closed red dot is especially worthwhile in bad weather and in rough environments. The completely closed housing provides better protection against rain, dust, dirt, and temperature fluctuations.
Additionally, the emitter is more secure and less vulnerable. This means the sight continues to function reliably even when conditions are far from pleasant. For hunting, tactical operations, or spending long periods outdoors, this is often the more suitable choice.