Zeroing a red dot sight: Guide for beginners

A Red Dot is only properly zeroed when the point of aim and point of impact coincide at a fixed distance. I always follow the same steps: make safe, use the same ammo, start at 25 m or 50 m, shoot a three-shot group, adjust at the group center, and verify with a second group.
This saves me from unnecessary adjustments on the sight and reduces errors caused by rushing. For beginners, 25 m is often the easiest starting point. Those using a carbine for short distances often choose 50 m. A rough rule of thumb for many optics is: 1 click = 1 cm at 100 m, so 0.5 cm at 50 m and 0.25 cm at 25 m.
What I pay attention to:
- Unload the firearm and always point it in a safe direction
- Check mount, battery, and barrel before the first shot
- Use only one type of ammunition, preferably from the same batch
- Support steadily: stock yes, barrel no
- Don’t adjust after single shots
- Groups under 5 cm are a good benchmark for hunting purposes
- After transport, drops, ammo changes, or modifications, re-check zero
In short: measure first, then click, then confirm. That’s how I achieve a zero with minimal effort that works both on the range and later in the field.
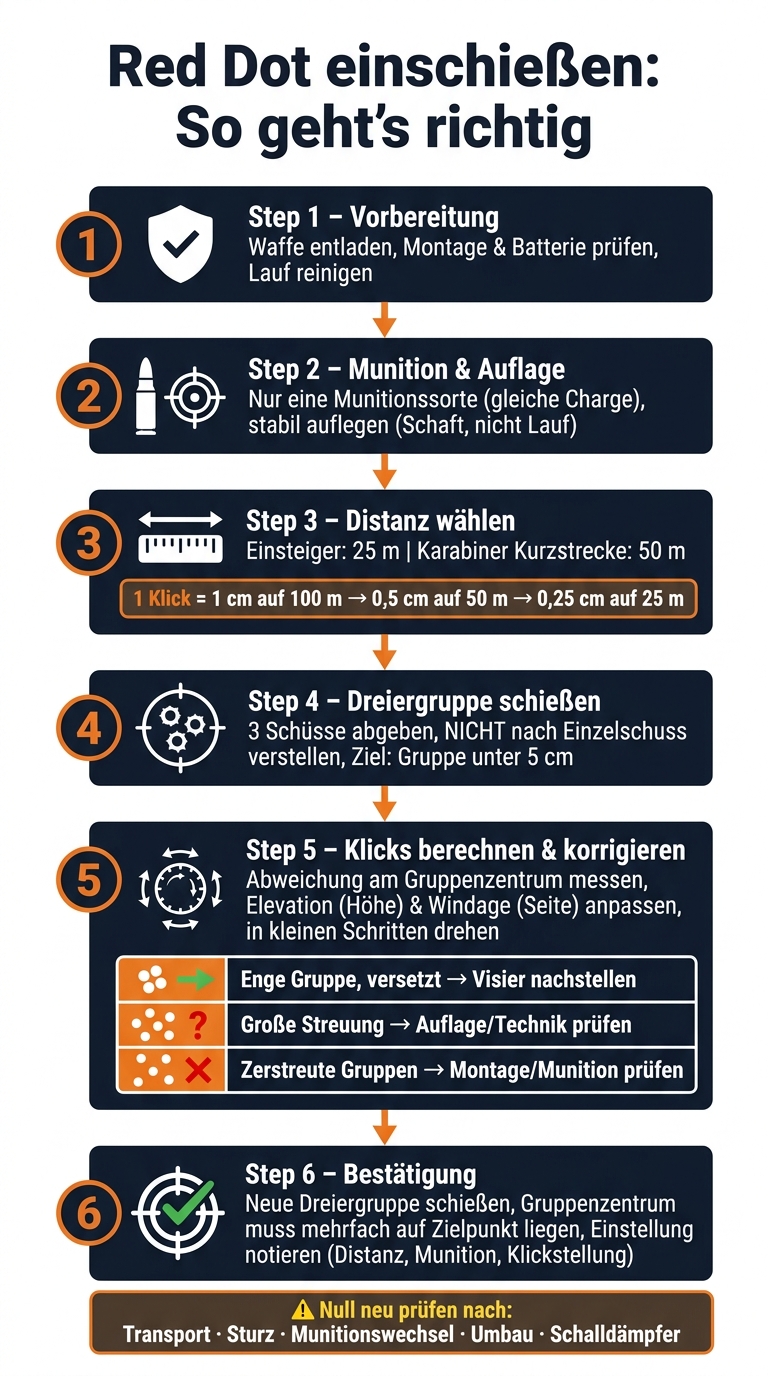
Red Dot zeroing: step-by-step guide
HOWTO: Zero a Red Dot
sbb-itb-1cfd233
Prepare firearm, Red Dot, and shooting position
Once the distance is set, you should carefully check a few things before the first shot: mount, battery, ammo, and shooting position. It sounds simple but often makes the difference between a clean zero and unnecessary guesswork.
Check mount, battery, and red dot
First, inspect the mount. It must be firmly seated and not loosened by transport, cleaning, or a bump. Also check the Red Dot itself for dirt and visible damage, and ideally insert a fresh battery right away. The barrel should be clean and not touching the support [1][2][4].
Use the same cartridge and rest steadily
When it comes to cartridges: don’t mix. Even different cartridge types or other batches of the same brand can shift the point of impact. Use the same cartridge consistently for zeroing, preferably from the same batch [2][4].
The rest must also be right. A shooting rest is ideal, sandbags are a good and stable choice. The firearm must not slip during the shot. Only the stock should rest, not the barrel [1][2][4].
With a clean, firm rest, you can evaluate the first shot group much better. Otherwise, you’ll end up wondering: Was it the sight or just an unstable position?
Keep the target simple and easy to read
Use a simple target with a clearly marked center. This way you see the point of impact immediately and don’t have to search or guess [2].
Fire and evaluate the first shot group
Once the mount, cartridge and rest are checked, it’s time for the first shot group. Important: Don’t adjust the sight after every single shot. That usually just causes chaos. If the group is tight but offset, you correct it in the next step by clicks.
Shoot a short group first, then adjust
Shoot a three-shot group first before you adjust anything. A single shot tells you almost nothing. It can stray due to flinching, an unstable hold or small trigger errors.
The group shows you the dispersion of firearm and cartridge. For hunting purposes, it ideally shouldn’t exceed 5 cm [1]. If it’s larger, the problem is often in the rest, technique or cartridge – not automatically the red dot sight.
Compare point of aim and point of impact
After the group, compare the point of aim with the point of impact, not the outlier. Using the same cartridge and a stable rest, you can now tell if the deviation comes more from the sight or the shooting technique.
If the hits are close together but off the point of aim, that’s a clear sign to adjust the sight. If the hits are widely scattered, the cause is usually elsewhere.
| Shot pattern | Likely cause | Next step |
|---|---|---|
| Tight group but offset | Sight setting incorrect | Adjust laterally and vertically |
| Large, scattered group | Rest error, flinching or instability | Improve rest, check trigger technique |
| Scattered groups | Mount or cartridge problem | Check screws, test different cartridge |
Pull the trigger evenly.
If the group is tight and clean, the next step is windage and elevation.
Adjust elevation and windage by clicks
If the group is tight but not where it should be, the adjustment knobs come into play. Elevation stands for the vertical adjustment, Windage for the horizontal adjustment.
Understanding elevation, windage and click values
Each click shifts the point of impact by a fixed value. For many optics, a rough guideline is: 1 click = 1 cm shift at 100 m [1]. At 50 m this is 0.5 cm per click, at 25 m 0.25 cm.
Check the manual before turning. Click value and rotation direction can vary depending on the model.
Make small corrections and shoot again
Always calculate the necessary clicks based on the group center – not the worst shot. This is important because a single outlier can quickly give a false impression.
If the group is, for example, 4 cm too low at 100 m, turn the Elevation turret four clicks towards “Up” [1]. Then shoot a new three-shot group and check what has changed.
It’s best to proceed in small steps. So rather turn a little, shoot again, and then check again, instead of adjusting too much at once.
Note the setting
Write down the zeroing distance, the ammunition used, and the click setting.
Confirm zero and overview of the most important steps
Shoot confirmation group and correct if needed
If the click setting is right, comes the final check. If the group is centered, shoot another three-shot group for confirmation. Only when the group center hits the target point cleanly more than once is the red dot considered zeroed [1][2]. For hunting, the group size should not exceed 5 cm [1].
If the confirmation group is still slightly off, correct in small steps and then check again with a new group [1][2].
Check zero again after transport or changes
A zero is only useful if it still holds after changes. Therefore, check it again after transport, a drop, ammunition change, mounting work, suppressor installation, or after longer non-use [2].
The most important points for beginners
In short, the process is pretty clear: work safely, use the same ammunition, always correct at the group center, and finally check with a confirmation group [1][2][3]. So quite simple: first measure, then correct, then confirm.
FAQs
What distance is best for beginners?
That mainly depends on how you use your red dot or rifle in practice.
For a red dot at short to medium distances, 25 to 50 meters is usually a good choice. For classic hunting with a rifle, zeroing is often done at 100 meters.
If you mainly shoot dynamically at short distances under 50 meters, 50 meters is often practical. In the end, it’s not some standard value that counts, but the distance at which you use your optic most often.
What do I do with a scattered group?
If your group is very scattered, first rule out technical causes. Check if the ammunition matches your barrel, if the mount is tight, and if the optic is working properly.
Also pay attention to a stable shooting rest and a firm position. Otherwise, you quickly pull the shot without noticing it directly. If the dispersion is still too large, have the firearm and optic checked by a professional.
When do I need to check the zero again?
Check the zero of your red dot regularly and readjust it if necessary.
Re-zeroing is necessary after a shock, drop, or strong impact, when changing ammunition, after technical changes to the firearm or optic, as well as after long transports, storage times, or noticeable deviations in the point of impact. In such cases, a control shot is important so you can check reliability.