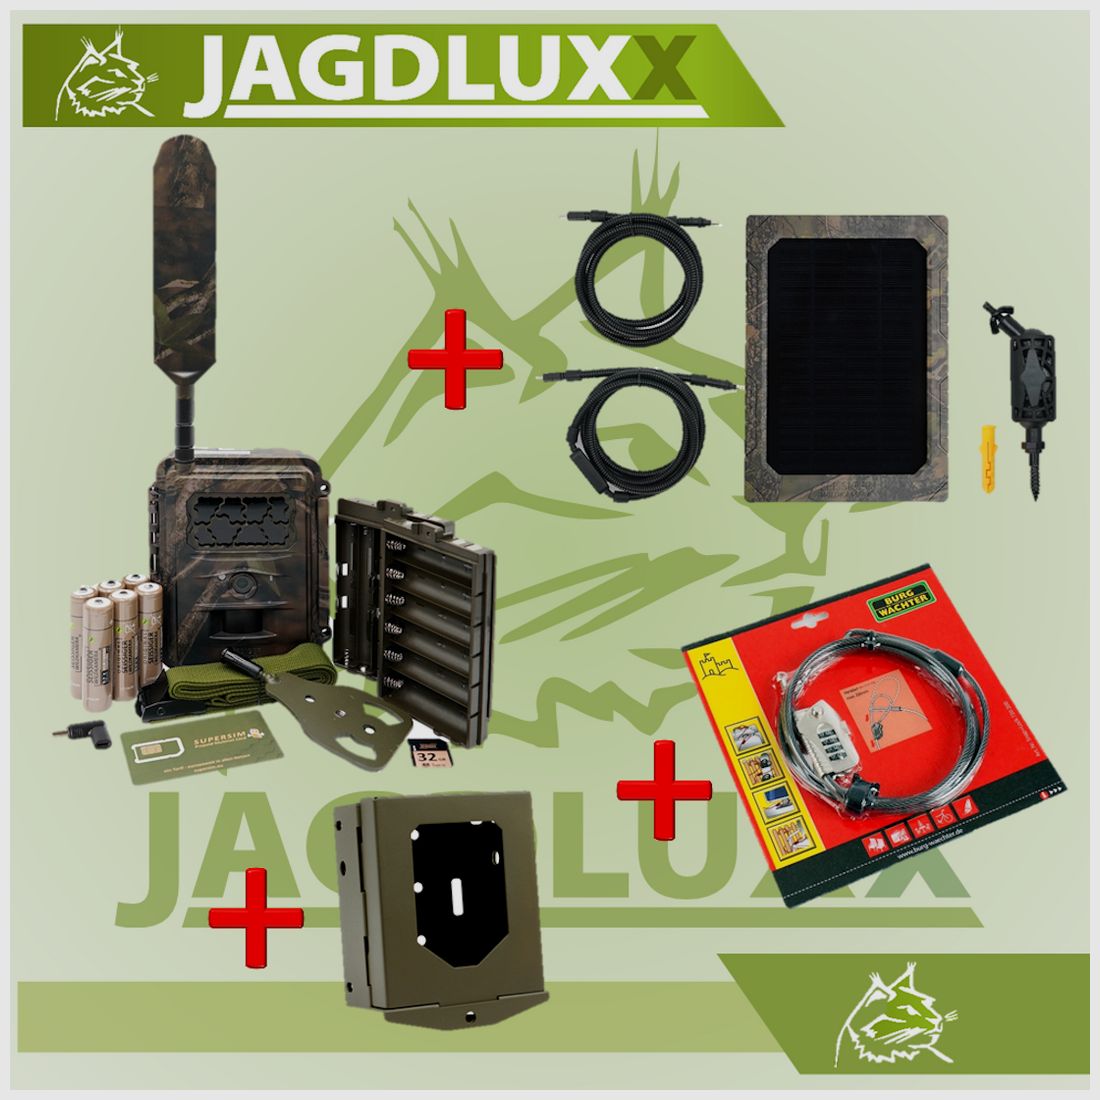

With the Seissiger Base Cam LTE Supersim, you can monitor your territory, your baiting area, or your property reliably at any time and in impressive image quality. Thanks to LTE transmission, the camera sends photos and videos lightning-fast directly to your smartphone or to the SUPERSIM app, so you are always in the loop without having to be on-site.
The motion-activated recording combined with the fast shutter ensures that you miss no important detail. The weatherproof, robust housing makes the camera the perfect companion for year-round use, whether in sunshine, rain, or snow. With the SUPERSIM card, the camera is ready to use immediately, without cumbersome setup or hidden additional costs.
Advantages of the Seissiger Base Cam LTE Supersim:
Whether you want to observe wildlife, prevent damage, or monitor security areas – the Seissiger Base Cam LTE Supersim delivers razor-sharp results and maximum reliability.
Robust steel housing made of powder-coated steel. Can be mounted by screwing or binding.
The SEISSIGER steel housing protects your wildlife camera from theft, vandalism, or wind and weather influences such as hail or falling stones. Together with the SEISSIGER cable lock, you have a secure theft protection.
If you want to secure a camera with an antenna, simply remove the cover for the antenna connection from the housing above.
Color: NATO Olive
Weight: approx. 0.85 kg.
Dimensions: 19.6 x 14 x 8 cm
Steel housing suitable for this camera
Multifunctional cable lock: The 2m long cable can be threaded through various objects and tightened continuously, providing quick and practical protection against removal and theft.
For this cable lock, you do not need any keys. Choose your personal 4-digit combination and open and close your lock quickly, securely, and conveniently.
With a total length of 2 meters, the cable lock is perfectly suited to wrap around thicker trees. The cable lock can be threaded through various objects and tightened continuously. The multifunctional cable lock is not only suitable for securing your wildlife camera but also for the safe transport of firearms in accordance with the firearms law. Additionally, bicycles, luggage, garden furniture, computer hardware, sports equipment such as skis and snowboards, and much more can also be secured with it.
Thanks to a thickness of 4.5 millimeters, the cable is stable and not easily cut. This keeps your wildlife camera quickly and practically secured against removal and theft.
Thanks to the rubber coating, the cable is also protected against external environmental influences.
AUTONOMOUS, NEVER-ENDING POWER SUPPLY
ABOUT THE SOLAR PANEL
The SEISSIGER solar panel is an additional power source for trail cameras.
The solar panel features a built-in lithium-ion battery that is continuously charged by the solar cells when exposed to sunlight. After connecting, the camera is powered as long as possible by the charged lithium battery of the solar panel and only switches to the internal batteries when the charge level of the solar panel's battery is temporarily too low. This significantly extends the lifespan of the camera batteries.
Before the first use of the solar panel, we recommend fully charging the built-in battery once at the outlet with a USB-C charging cable (takes up to 12 hours).
The solar panel can be used with 12V and 6V trail cameras.
You will receive two DC output cables, a 12V cable (left) and a 6V cable with voltage converter (right). SEISSIGER cameras use the lower voltage of 6V; many other trail cameras operate at 12V and use the left DC cable.
To connect the solar panel to the camera, select the appropriate cable. On one side of the cable, there is a thread below the connector. This side belongs in the solar panel. Open the left rubber cover and carefully screw the connector into the internal thread of the solar panel. Please ensure that you do not screw the cable in too tightly, as you could damage the thread on the cable.
Finally, connect the camera socket of the solar panel to the input socket for external power supply of your camera (see the user manual of your camera model).
Technical specifications see:
Mit der Seissiger Base Cam LTE Supersim überwachst du dein Revier, deine Kirrung oder dein Grundstück jederzeit zuverlässig – und das in beeindruckender Bildqualität. Dank LTE-Übertragung sendet die Kamera Fotos und Videos blitzschnell direkt auf dein Smartphone oder in die SUPERSIM-App, sodass du jederzeit im Bilde bist, ohne vor Ort sein zu müssen.
Die bewegungsgesteuerte Aufnahme in Kombination mit dem schnellen Auslöser stellt sicher, dass dir kein wichtiges Detail entgeht. Das wetterfeste, robuste Gehäuse macht die Kamera zum perfekten Begleiter für den ganzjährigen Einsatz – egal ob bei Sonnenschein, Regen oder Schnee. Mit der SUPERSIM-Karte ist die Kamera sofort einsatzbereit, ohne umständliche Einrichtung oder versteckte Zusatzkosten.
Vorteile der Seissiger Base Cam LTE Supersim:
Egal, ob du Wildtiere beobachten, Schäden vorbeugen oder Sicherheitsbereiche überwachen möchtest – die Seissiger Base Cam LTE Supersim liefert dir gestochen scharfe Ergebnisse und maximale Zuverlässigkeit.
Robustes Stahlgehäuse aus pulverbeschichtetem Stahl. Kann zur Montage angeschraubt oder -gebunden werden.
Das SEISSIGER Stahlgehäuse schützt Ihre Wildkamera vor Diebstahl, Vandalismus oder Wind- und Wettereinflüsse wie Hagel oder herabfallende Äste.
Zusammen mit dem SEISSIGER Kabelschloss haben Sie eine sichere Diebstahlsicherung.
Wenn Sie eine Kamera mit Antenne sichern möchten, so lösen Sie oben aus dem Gehäuse die Abdeckung für den Antennenanschluss.
Farbe: Nato-Oliv
Gewicht: ca. 0,85 kg.
Maße: 19,6 x 14 x 8 cm
Stahlgehäuse passend für diese Kamera
Multifunktions-Kabelschloss: Das 2m lange Kabel kann durch verschiedene Gegenstände gezogen und stufenlos festgespannt werden und schützt damit schnell und praktisch gegen Wegnahme und Diebstahl.
Für dieses Kabelschloss benötigen Sie keinerlei Schlüssel. Wählen Sie Ihre persönliche 4-stellige Zahlenkombination und öffnen und schließen Sie Ihr Schloss schnell, sicher und bequem.
Mit einer Gesamtlänge von 2 Metern ist das Kabelschloss perfekt geeignet, um es auch um dickere Bäume zu legen. Das Kabelschloß kann durch verschiedene Gegenstände gezogen und stufenlos festgespannt werden.Das Multifunktions-Kabelschloss eignet sich nicht nur zur Sicherung Ihrer Wildkamera, sondern auch für den sicheren Transport von Waffen im Sinne des Waffengesetzes. Außerdem können auch Fahrrad, Gepäck, Gartenmöbel, Computer Hardware, Sportgeräte wie Skier und Snowboards und vieles mehr damit gesichert werden.
Dank einer Stärke von 4,5 Millimetern ist das Kabel stabil und nicht ohne weiteres zu durchtrennen. So bleibt Ihre Wildkamera schnell und praktisch gegen Wegnahme und Diebstahl gesichert.
Dank der Gummi-Ummantelung ist das Kabel auch gegen äußere Umwelteinflüsse geschützt.
AUTONOME, NIEMALS ENDENDE STROMVERSORGUNG
ÜBER DAS SOLARPANEL
Das SEISSIGER Solarpanel ist zusätzliche Stromquelle für Wildkameras.
Das Solarpanel verfügt über einen eingebauten Lithium-Ionen-Akku, der von den Solarzellen kontinuierlich aufgeladen wird, wenn sie der Sonne ausgesetzt sind. Nach dem Anschließen wird die Kamera so lange wie möglich von der geladenen Lithiumbatterie des Solarpanels mit Strom versorgt und schaltet nur dann auf die internen Batterien um, wenn der Ladezustand des Akkus des Solarpanels vorübergehend zu niedrig ist. Dadurch haben die Batterien der Kamera eine deutlich längere Lebensdauer.
Vor der ersten Nutzung des Solarpanels empfehlen wir, den eingebauten Akku einmal an der Steckdose mit einem USB-C Ladekabel vollständig aufzuladen (dauert bis zu 12 Stunden).
Das Solarpanel kann mit 12V und 6V Wildkameras verwendet werden.
Sie erhalten zwei DC-Ausgangskabel, ein 12V-Kabel (links) und ein 6V-Kabel mit Spannungswandler (rechts). SEISSIGER-Kameras verwenden die niedrigere Spannung von 6V; viele andere Wildkameras arbeiten mit 12V und verwenden das linke DC-Kabel.
Um das Solarpanel mit der Kamera zu verbinden, wählen Sie das passende Kabel aus. Auf einer Seite des Kabels befindet sich unterhalb des Steckers ein Gewinde. Diese Seite gehört in das Solar Panel. Öffnen Sie die linke Gummiabdeckung und schrauben Sie den Stecker vorsichtig in das Innengewinde des Solar Panels. Bitte achten Sie darauf, dass Sie das Kabel nicht zu fest einschrauben, da Sie sonst das Gewinde am Kabel beschädigen könnten.
Schließen Sie schließlich die Kamerabuchse des Solar Panels an die Eingangsbuchse für externe Stromversorgung Ihrer Kamera an (siehe Bedienungsanleitung Ihres Kameramodells).
Technische Spezifikationen siehe: