
A wrong thread on the silencer can be dangerous. It can cause damage to the weapon, the silencer, and even injuries. To avoid this, you should check your thread carefully. Here’s how to proceed step by step:
- Differentiate thread types: Metric threads (e.g., M14x1) and imperial threads (e.g., 1/2"x28 TPI) are the most common standards. Pay attention to diameter, pitch, and thread direction.
- Use tools: With a caliper and a thread gauge, you can determine the measurements accurately. A dial gauge helps with alignment checks.
- Don’t forget cleaning: Dirt or residues can distort measurements. Clean the thread thoroughly.
- Check concentricity: Check if the silencer fits precisely to avoid errors.
- Conduct a dry function test: Test the assembly without ammunition to ensure everything fits correctly.
Tip: If in doubt or if there are damages, have the thread checked by a gunsmith. Safety comes first.
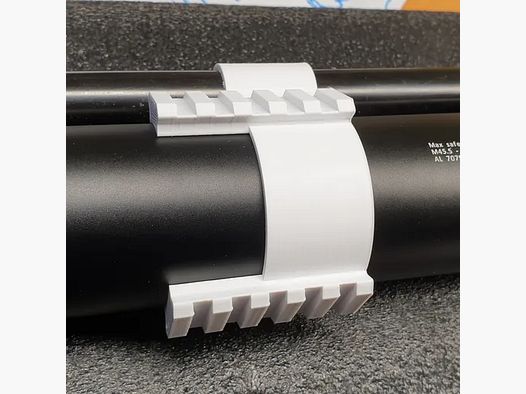
Silencer - One for all! With this genius adapter #nordjagd
Thread Types and Specifications
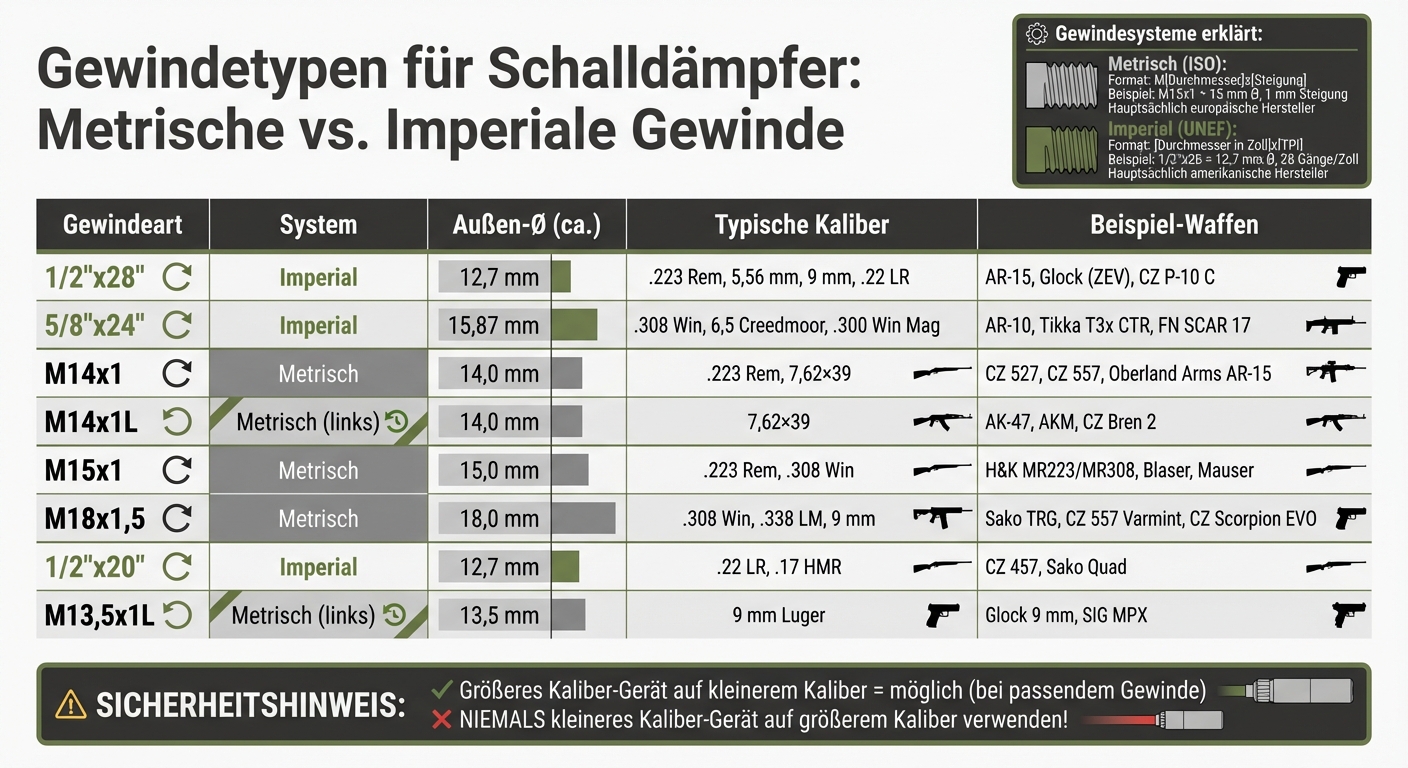
Overview of common threads for silencers: Metric and imperial thread types compared
Choosing the right thread is crucial for safety. Here’s an overview of common thread types and their specifications.
When purchasing a silencer or muzzle device, you will encounter two main thread systems: metric (ISO) and imperial (UNEF) threads. European manufacturers like Blaser, Mauser, or Heckler & Koch mostly use metric threads, identifiable by the prefix “M” [3]. American firearms, on the other hand, rely on imperial threads, which are specified in inches – typical for AR platforms.
The difference lies in the measurement method: For M15x1, the first number indicates the outer diameter in millimeters (15 mm), and the second indicates the pitch (1 mm) [3]. In imperial threads like 1/2"x28, the first number represents the diameter in inches (1/2 inch = 12.7 mm) and the second indicates the number of threads per inch (TPI) [3].
Here’s a detailed overview of metric and imperial threads, along with a comparison table.
Metric Threads
Common metric threads for hunting firearms are M14x1, M15x1, and M18x1. Heckler & Koch, for example, often uses M15x1, even on AR15 platforms like the MR223, where internationally 1/2"x28 is usually standard [6]. CZ models like the CZ 527 or CZ 557 use M14x1 or M15x1 depending on the caliber [3]. For larger calibers like .300 Win Mag or .338 Lapua, M18x1.5 threads are often used, for example, on Sako or Accuracy International [3].
Note the thread direction: Most threads are right-handed (clockwise). However, there are left-handed variants – often found on weapons from the former Eastern Bloc. These are marked with “L” or “LH”. Standard AK-47 models and AKM clones (7.62×39) typically use M14x1L [6]. The AK-74 and AK-100 series, on the other hand, use M24x1.5 [6]. Glock pistols also have left-handed threads: M13.5x1L for 9 mm models and M16x1L for .45 ACP [3].
Imperial Threads
In imperial threads, 1/2"x28 TPI and 5/8"x24 TPI dominate [3]. The 1/2"x28 thread (outer diameter 12.7 mm) is standard for AR-15 platforms in .223 Rem/5.56 mm as well as for .22 LR and 9 mm [3]. Larger calibers like .308 Win, 6.5 Creedmoor, or .300 Win Mag often use 5/8"x24 (outer diameter 15.87 mm) – typical for AR-10 platforms and precision rifles [3].
For .22 LR firearms like the CZ 457 or the Sako Quad, 1/2"x20 is often used [6]. SIG Sauer firearms additionally feature a special “Sig Taper” at the end of the thread, which sometimes requires adapters for mounting silencers [6].
Comparison Table of Thread Types
| Thread Type | System | Outer Diameter (approx.) | Typical Calibers | Example Firearms |
|---|---|---|---|---|
| 1/2"x28 | Imperial | 12.7 mm | .223 Rem, 5.56 mm, 9 mm, .22 LR | AR‑15, Glock (ZEV), CZ P‑10 C |
| 5/8"x24 | Imperial | 15.87 mm | .308 Win, 6.5 Creedmoor, .300 Win Mag | AR‑10, Tikka T3x CTR, FN SCAR 17 |
| M14x1 | Metric | 14.0 mm | .223 Rem, 7.62×39 | CZ 527, CZ 557, Oberland Arms AR‑15 |
| M14x1L | Metric (left) | 14.0 mm | 7.62×39 | AK‑47, AKM, CZ Bren 2 |
| M15x1 | Metric | 15.0 mm | .223 Rem, .308 Win | H&K MR223/MR308, Blaser, Mauser |
| M18x1.5 | Metric | 18.0 mm | .308 Win, .338 LM, 9 mm | Sako TRG, CZ 557 Varmint, CZ Scorpion EVO |
| 1/2"x20 | Imperial | 12.7 mm | .22 LR, .17 HMR | CZ 457, Sako Quad |
| M13.5x1L | Metric (left) | 13.5 mm | 9 mm Luger | Glock 9 mm, SIG MPX |
Important Safety Note: A muzzle device for larger calibers (e.g., .308) can be used on smaller calibers (.223) if the threads match. Never use a device for smaller calibers on larger calibers – the projectile could hit internal parts [3].
The next section covers the tools needed for measurement and installation.
Required Tools and Materials
To check thread compatibility accurately, you need some basic measuring and cleaning tools. With the right equipment, you can determine the thread diameter and pitch precisely – this not only saves money but also prevents potentially dangerous situations while shooting. Here’s an overview of the required tools and materials.
Measuring and Mounting Tools
A caliper, whether analog or digital, is essential for measuring the outer diameter of the barrel thread [5][8]. Digital models that can switch between metric and imperial units cost about €19.00–23.50 [10]. For even more precise measurements, a micrometer is recommended [5].
Another key tool is the thread gauge (Thread Pitch Gauge). This consists of metal combs that determine the thread pitch – either in millimeters or in threads per inch (TPI) [5][7]. Standard sets with 52 sheets cover both metric (0.4–7.0 mm pitch) and imperial threads (4–42 TPI). They are already available for €8.99 to €14.95 [7][9]. High-quality variants, such as those from Mitutoyo, cost about €50.00 [9].
Tip: Hold the gauge vertically against the thread and use a light source – if light passes through, the pitch does not match [10].
To check the concentricity, which ensures that the silencer sits straight, you need a dial gauge with a stand or a cylindrical test mandrel [10].
Important: Before each measurement, always remove the magazine, check the chamber, and – if possible – remove the bolt [5].
Cleaning Accessories
In addition to precise measuring devices, thorough cleaning of the threads is crucial to avoid erroneous results. Even the smallest dirt particles can distort measurements. A seemingly correct M12 thread could measure only 11.5 to 11.6 mm due to contamination [11][12]. Residues from thread locking compounds, rust, or powder can also prevent the thread gauge from sitting correctly [11][12].
- Loose deposits are best removed with a wire or nylon brush.
- Greases and oils can be dissolved with degreasers or solvents.
- Stubborn dirt can be carefully removed with a hand tap.
After cleaning, the thread should be dried lint-free. Only after this careful preparation are accurate measurements possible.
sbb-itb-1cfd233
How to Check Thread Compatibility
Once all necessary tools are ready, you can check the thread compatibility in five clear steps.
Step 1: Clean and Inspect the Thread
First, remove the magazine and check the chamber and the bolt. Then measure the outer diameter of the thread at both the beginning and the end [5]. Inspect the threads thoroughly to ensure that no damages or deposits impair the fit. If the diameters are equal, it is a parallel thread; if they differ, it is a tapered thread [10].
Note: Some firearm models, especially from the Eastern Bloc, use left-hand threads (counterclockwise), such as M14x1LH [3].
Step 2: Measure Thread Dimensions
Using a caliper or a micrometer, measure the outer diameter over the thread peaks. Note that the measured value may be slightly below the nominal size. To determine the pitch, hold a thread gauge against the light. If light shines through, the pitch does not match. If no gauge is available, you can set the caliper to a multiple of the suspected pitch (e.g., 6 mm for a 1.5 mm pitch) and check if this distance fits exactly over four thread peaks [10].
Step 3: Conduct a Hand Test
Carefully screw the muzzle device or silencer onto the thread by hand. It should turn evenly and without resistance. If you encounter resistance indicating a faulty thread, you should stop immediately and have the threads checked by a gunsmith [1].
Step 4: Check Concentricity
Using a dial gauge or a cylindrical test mandrel, check whether the thread aligns exactly with the bore axis of the barrel. This alignment is crucial for precise shots and increases safety [4].
Step 5: Conduct a Dry Function Test
If the alignment is correct, perform a dry function test. Mount the muzzle device according to the manufacturer's instructions and tighten it to the specified torque [1]. Test the bolt several times to ensure that the function is not impaired. Also, pay attention to the correct indexing, meaning the exact alignment with the bore axis. This is especially crucial for compensators and silencer mounts. After the first shots at the shooting range, you should check the tight fit again, as the muzzle device may settle or loosen during use [1].
Common Mistakes and What You Can Do About Them
Even experienced shooters make typical mistakes when checking threads that can lead to damage or even safety risks. A classic: Relying blindly on supposed standard threads (e.g., 1/2x28 TPI) without checking them beforehand. While standard threads are common, one should never rely solely on them. The same applies to the correct alignment of the thread – care is required here.
Thread Direction: Right-Hand vs. Left-Hand Threads
Right-hand threads are tightened by turning clockwise, while left-hand threads are turned counterclockwise. Left-hand threads are often found on Eastern European firearms like AK variants (e.g., M14x1 LH) or on European pistols from manufacturers like Glock, Sig Sauer, or Heckler & Koch. Examples include threads like 13.5x1 LHM for 9 mm or 16x1 LHM for .45 ACP. If you feel strong resistance when screwing on, it could be due to a wrong thread direction. In this case, stop immediately to avoid damage.
Using Thread Adapters Correctly
If the barrel and silencer have different threads, adapters can help. Important: Only use adapters from the same manufacturer [1] to ensure precise alignment. Cheap adapters can impair concentricity and thus pose safety risks. Additionally, the adapters must be suitable for your caliber – a .223 adapter on a .308 barrel can be dangerous. If you still have trouble screwing on, don’t hesitate to seek expert assistance.
When You Should See a Gunsmith
"If anything feels off (cross-threading, excessive play, or misalignment), stop and have a qualified gunsmith inspect the parts." – Gorilla Machining[1]
If irregularities occur during testing – such as uneven screwing by hand, excessive play, or faulty alignment – it’s time to consult a professional. A gunsmith can repair damaged threads by recutting or professionally create new threads on unthreaded barrels [3]. Especially important: In the case of cross-threading, stop immediately – applying force will only lead to expensive repairs.
Conclusion
By following the steps described above, you ensure that your setup functions safely and precisely. Always make sure to create a safe working environment before measuring. Clean the threads thoroughly, measure the dimensions accurately, test the fit manually only, and conduct a concentricity test with a caliber-specific test rod. This test is considered the most reliable way to avoid dangerous baffle strikes [2].
Important: While about 90% of UNEF threads are either 1/2"x28 TPI or 5/8"x24 TPI [3], you should never rely blindly on standard sizes. Always check the thread direction and ensure that the caliber is compatible. A high-quality thread gauge set can be a great help here [5].
If you need additional accessories, Gunfinder offers a wide selection of brands like A-TEC and B&T. Thanks to the practical filter functions and technical guides in the Gunfinder magazine, you can specifically search for suitable products [13].
If something doesn’t fit – for example, in the case of cross-threading or faulty alignment – stop work immediately and consult a gunsmith. Applying force will only lead to expensive damage. With the right tools, some patience, and this guide, you can ensure a perfectly tuned setup.
FAQs
How do you differentiate between metric and imperial threads?
Metric threads are identified by the prefix “M” (e.g., M14 × 1.5), while imperial threads do not have such a designation. In metric threads, the pitch is specified in millimeters per thread (e.g., 1.5 mm). In contrast, imperial threads are specified in threads per inch (TPI). Another distinguishing feature is the outer diameter: this is measured in millimeters for metric threads and in inches for imperial threads.
For precise determination, you can use a thread measuring device. Such tools have scales for both metric and imperial measurements. Once you have identified the thread type, you can find the suitable silencers and muzzle devices that fit your setup perfectly at Gunfinder.
What tools do you need to check thread compatibility?
To ensure that your silencer and muzzle device fit perfectly together, a thread pitch gauge is essential. With this tool, you can accurately determine the thread pitch and ensure that everything is compatible.
A typical thread pitch gauge has leaves for both metric (e.g., 0.4–7.0 mm) and inch-based (e.g., 4–42 TPI) threads. This allows you to quickly check if the threads match – ensuring that your accessories function smoothly.
When is it advisable to consult a gunsmith for thread inspection?
If you do not have suitable testing tools like thread gauges, calipers, or optical devices available, it is a good idea to consult a gunsmith. Especially when the thread does not fit cleanly or is difficult to turn, a professional can determine the cause with precise measuring methods and resolve the issue.
A professional inspection is crucial to ensure that your silencer and muzzle device work optimally together. This helps you avoid potential damage. A gunsmith not only brings the necessary knowledge but also has the right tools to reliably check thread compatibility.