Knife sharpeners for processing game compared

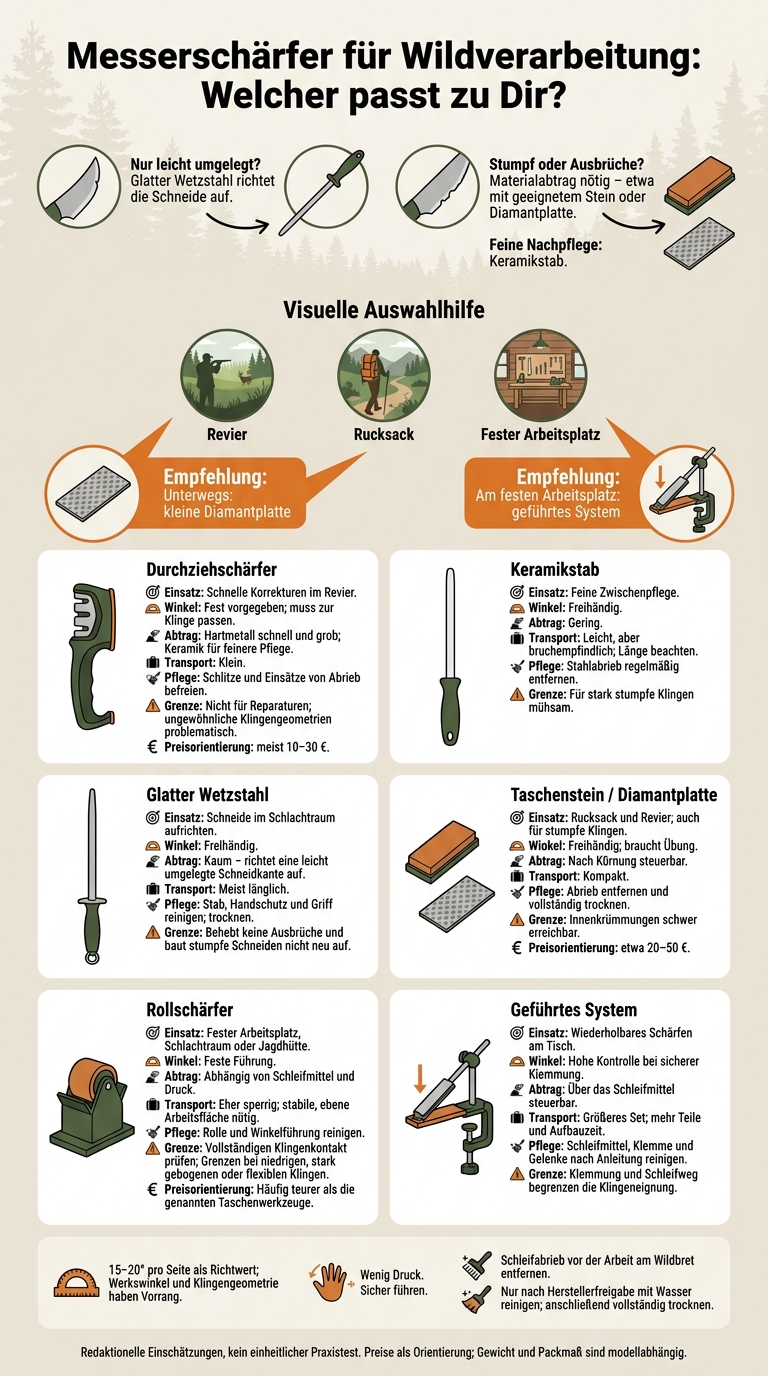
For use in the field, I’d choose a small diamond plate; for a fixed workspace, a guided system. If your edge is only slightly rolled, a smooth honing steel is enough. But for dull blades or chips, you need a tool that removes steel.
I compare six types based on edge quality, angle control, material removal, price, weight, packed size, and cleaning. Pull-through sharpeners usually cost €10–30, while pocket stones and diamond plates cost around €20–50. Rolling sharpeners are often more expensive.
The quick comparison: These are estimates, not results from a standardized field test.
| Type | Edge, angle, and material removal | Portability and care | Use |
|---|---|---|---|
| Pull-through sharpener | Quick touch-up; fixed angle; carbide removes material aggressively | Compact; keep slots clean | In the field |
| Ceramic rod | Fine touch-ups; freehand angle; removes little material | Lightweight but fragile; remove residue | Between uses |
| Smooth honing steel | Realigns the edge; freehand angle; removes almost no material | Often long; easy to clean | Butchering room |
| Pocket stone / diamond plate | Works on dull blades too; takes practice; material removal depends on grit | Compact; remove residue and dry | Backpack and field |
| Rolling sharpener | Fixed angle; results depend on blade contact | Rather bulky; clean the roller and guide | Fixed workspace |
| Guided system | Good angle control; material removal depends on the abrasive | More parts, more maintenance, and setup time | Sharpening at a table |
<u>My most important tip:</u> Choose a sharpener that suits your blade and where you’ll use it. Use light pressure, follow the existing edge angle, and remove sharpening residue before continuing to work with the meat.
Knife sharpeners for game processing: Which one is right for you?
1. Compact Pull-Through Sharpeners
Edge Quality, Angle Control, and Material Removal
Pull-through sharpeners are suitable for quick touch-ups in the field—for example, between two steps of a job. They’re not designed for repairs. Carbide removes material quickly but aggressively. Ceramic is suitable for finer, regular maintenance. Diamond works well with hard steels; how fine the edge gets depends on the grit. Single-stage carbide sharpeners offer little control. Models with coarse and fine stages can handle more tasks.[2][4][7]
Example: Gamecooling, 21° per side, interchangeable reversible inserts, €38.90 plus shipping.[10]
A fixed sharpening angle can reshape flat edges and remove a lot of material in the process. So pull the blade through straight, evenly, and with light pressure—without jerking it. If it’s only slightly dull, the fine setting may be enough.[6][8][9]
Only use blade types approved by the manufacturer. For chips, it’s better to use a sharpening stone or take the knife to a professional.[3][5] For finer maintenance, you need more control and less material removal.
Weight and packed size
In the field, a secure grip matters more than the lowest possible weight. In the butchering room, a wide, non-slip base is more important. Very small housings are often harder to hold and guide with wet or greasy hands. A case protects the sharpening inserts when carrying it in a backpack.
Cleaning and care
Open slots and removable inserts make cleaning easier. Brush metal filings out of the slots and inserts, and wipe the housing with a damp cloth. Only immerse or rinse models that are explicitly designed for it. Easy-to-clean pull-through sharpeners are especially practical where hygiene and speed matter equally.
sbb-itb-1cfd233
KNIFE SHARPENER COMPARISON - Sharpening knives made easy!
2. Ceramic sharpening rods
After the quick pull-through sharpener, ceramic rods offer more control for fine touch-ups. They’re a good choice if you sharpen your knives regularly but don’t need to repair major damage.
Edge quality, angle control, and material removal
Ceramic rods remove little steel and are suitable for regularly honing hunting and butchering knives. If the edge is slightly dull, 2 to 5 light strokes per side are enough, alternating sides each time. If that doesn’t work, correct your technique instead of increasing the pressure.[11][15]
Hold the angle freehand, following the existing bevel. For many knives, 15–20° per side is standard. Place the rod upright on a non-slip surface. Keep your hand behind the guard. Guide the blade smoothly downward from heel to tip and away from your body. Keep your wrist steady to maintain the same angle.[11][13][16]
Weight and packed size
For your backpack, the overall length matters; at your workstation, it’s the usable honing length. Compare these measurements separately.
Example: 25 cm honing length, 39 cm overall length, around 200 g in weight.[17]
Ceramic is brittle, so pack the rod in a sleeve or a sturdy compartment in your backpack.[16]
Cleaning and care
Gray or black marks are usually steel residue, not wear. Remove them regularly with an eraser. For stubborn residue, use water and a mild abrasive cleaner if the manufacturer recommends it. Then rinse the rod thoroughly and dry it. Clean the blade afterward, too. Only put the rod in the dishwasher if the manufacturer says it’s dishwasher-safe.[11][12][14]
3. Honing steels
After the fine touch-up with ceramic, it’s time to use a honing steel: it quickly realigns the cutting edge for everyday use.
Edge quality, angle control, and material removal
A smooth honing steel realigns a slightly rolled edge. This works well for robust hunting and butchering knives that have simply lost some bite. Unlike ceramic, it maintains the edge rather than rebuilding it. For chips, noticeably dull edges, or heavily rounded edges, however, you need a sharpener that removes material. A traditional honing steel is often less suitable for very hard or very thinly ground blades.[18][19][22]
Grooved steels can have a stronger effect on the edge. Diamond-coated models also remove material. If the cut doesn't improve, sharpen the blade instead of honing it harder. Test the result on paper, not on your skin.[20][21][23][24]
Weight and packed size
A lightweight model is a good choice for a mobile kit in the hunting grounds, while a heavy one suits a butchering table in the processing room:
The Morakniv Hunting Wetzstahl is listed as 32.0 cm long overall and weighing 161 g. The F. Dick Wetzstahl 2000 oval measures 46 cm and weighs 530 g.[27][28]
In a backpack, length is the main drawback. Carry the steel protected. A short model is enough for maintaining an intact edge on the go, but it can't replace a pocket stone for repairs.[26][27]
Cleaning and care
You don't need water or abrasives for honing. Remove blood and tissue residue from the blade first. Then clean the rod, hand guard, and handle too, as grease can collect there. F. Dick recommends a mild, alkaline, chlorine-free cleaning agent and thorough rinsing. Put the steel away only when it is completely dry and clean.[25][26][29]
4. Pocket stones and diamond plates
When honing is no longer enough, pocket stones and diamond plates provide the actual sharpening.
Edge quality, angle control, and material removal
Diamond plates remove steel quickly and restore dull edges or small chips. Fine stones, on the other hand, are for maintenance and finishing, not repairs. Combination stones offer a coarse and a fine surface: shape first, then refine. This lets you touch up blades in the field and sharpen them at the butchering table.
Keep the angle consistent and follow the existing bevel. 15–20° per side is a guideline; the manufacturer's specifications take precedence. Work one side with light pressure, from the heel to the tip, until a fine burr forms. Then switch sides and remove the burr with light, alternating strokes.[31][34]
Weight and packed size
When you're on the go, sharpening performance isn't the only thing that matters. The tool should also be compact and protected during transport.
The DMT Diafold measures about 125 mm when closed and about 240 mm when open. Its sharpening surface is approximately 102 × 25 mm; some versions are listed at around 50–70 g. The folding design protects the surface during transport and provides a handle for sharpening on the go.[37][38][39][40]
Place loose stones on a firm, non-slip surface. In the butchering room, a wide stone makes it easier to guide the blade steadily. In the field, any improvised support must also be secure. Keep your fingers and legs out of the blade’s path. Protect ceramic stones from impacts in your backpack.
Cleaning and care
Depending on the model, you can sharpen dry or with water. The Diafold does not need oil. DMT allows both dry use and use with water.[35][36] Remove metal residue with a soft brush or cloth. If you used water, dry the plate completely afterward.
Diamond plates usually stay flat, but wear reduces their sharpening performance. Metal residue can clog ceramic surfaces. If the tool still sharpens poorly after cleaning, replace it.[30][32][33]
5. Rolling sharpeners
Rolling sharpeners fall between freehand tools and guided systems. They offer more guidance than a sharpening stone, but are less portable than a pocket tool.
Edge quality, angle control, and material removal
Rolling sharpeners use a fixed angle. For robust hunting blades, 20° per side usually works well, as long as it matches the existing bevel. Guide the blade over the entire edge with light, even pressure.[41][42] Remember: diamond shapes, ceramic smooths.[84]
Check that the heel, belly, and tip are all covered. Some areas can be hard to reach on short blades with a pronounced guard. Strongly curved or flexible blades make it harder to maintain even contact. Rolling sharpeners are generally unsuitable for serrated edges. The fixed guide helps control the angle, but doesn't guarantee an even edge.[46]
Weight and packed size
Rolling sharpeners need a stable surface. That's why they're better suited to a butchering room or hunting cabin than a daypack.[43][44][45]
Cleaning and care
Wipe down the knife, angle guide, and sharpening roller after use. Remove the swarf and check that the roller spins freely.
Check whether replacement discs are available individually. This lets you use the rolling sharpener for longer, but adds to the cost. That's why rolling sharpeners often aren't a truly budget-friendly option.
If you want more control without freehand sharpening, you need a compact guided system.
6. Compact guided sharpening systems
Edge quality, angle control, and material removal
If a rolling sharpener doesn't give you enough repeatability, a guided system is the next step. Among budget sharpeners, these systems offer the best angle control—especially for repeatable results at the workbench.
Mark the bevel with a permanent marker. If color remains on the shoulder or cutting edge after a light sharpening stroke, the angle is wrong.[49] Clamping the knife and checking for a burr take practice. Allow a few minutes per knife for your first setup.
According to the product specifications, the Work Sharp Precision Adjust can be set from 15° to 30° in 1° increments. The set includes 320- and 600-grit diamond abrasives and a fine ceramic stone.[51]
For dull, undamaged knives, start with the finest effective grit. You only need coarse grits for damage or angle corrections.
Also check the blade thickness: according to the specifications, the system accommodates blades up to about 6 mm thick. Short, flexible or strongly curved blades and a pronounced finger guard can limit clamping or the sharpening stroke.[50][51] So consistent edge geometry matters more here than easy portability.
Weight and packed size
According to the product specifications, the Precision Adjust weighs around 700 g and measures approximately 15 × 11.5 × 20 cm.[50][51]
Assess the entire set—clamp, guide, abrasives and case—not just the base unit. With all its separate parts, a system like this is much less convenient to carry in a backpack than a pocket stone.
Too bulky for a backpack, but good for sharpening several knives at a table: In a butchering room or at a stable workstation by your vehicle, you can sharpen several blades with a repeatable angle setting.
Cleaning and care
Clean diamond plates dry or slightly damp, depending on the manufacturer's instructions.[47][48] Remove metal filings from the clamp and joints as instructed. Store all parts in a dry place. Use water or oil only on sharpening surfaces approved for it.[49]
Before buying, also check the cost of replacement plates and the case: they make the set considerably more expensive.
Edge quality, angle control and material removal
Now that we've looked at the individual tools, let's focus on what matters at the blade.
The material being cut determines the requirements: When cutting through hide, the edge needs stability. It should cleanly cut connective tissue and glide through meat with as little resistance as possible.
15–20° per side is a good starting point. But the angle needs to suit the steel, grind, and intended use. At 20° per side, the total angle is 40°.[52][1][4]
The table shows the differences between designs for the hunting grounds, the butchering room, and your backpack. It doesn't provide any new measurements.
| Tool type | Time required | Edge quality | Angle repeatability | Steel removal | Blade limitations |
|---|---|---|---|---|---|
| Pull-through sharpener | Short | Carbide removes material roughly; a fine honing stage is recommended | High with a compatible blade | High with carbide | Unusual geometries can be problematic |
| Ceramic rod | Short for maintenance | Fine touch-ups | Hand-guided | Low | Hard work on very dull blades |
| Smooth honing steel | Short for maintenance | Realigns a rolled edge | Hand-guided | Very low | Doesn't fix chips |
| Pocket stone / diamond plate | Medium to long | Very good with practice | Hand-guided | Controlled by the grit | Hard to reach inside curves |
| Rolling sharpener | Medium | Consistent with good contact | Medium to high | Depends on the abrasive and pressure | Limited with low-profile, heavily curved blades |
| Guided system | Medium, including setup | Consistent bevel | High with secure clamping | Controlled by the abrasive | Use is limited by the clamp and sharpening path |
These figures are guidelines, not results from a standardized comparative test. No measured sharpening times, sharpness values, or material removal amounts are available.
Dull blades need material removed—realigning the edge alone isn't enough. Carbide removes material quickly and roughly. Follow with finer sharpening stages.[53][54][4]
After removing material, deburring is key: The edge can only take a load once it's burr-free. Check it in the light and with a careful paper cut. For serrations, use a suitable, usually tapered rod instead of the standard V-notch.[55][56]
Weight, packed size, and cleaning
Along with sharpness and angle, weight, packed size, and cleaning are key in the field.
In your backpack, weight, space, and protection matter. At your workstation, cleaning takes priority. When transporting your gear, always account for the entire set: sharpener, case, protective caps, and accessories. Weight and size specifications for the Work Sharp Guided Field Sharpener vary by source, so no reliable packed dimensions can be provided.[63][64][65][66]
The table shows which options fit in a backpack and which are better suited to a permanent spot in your vehicle or processing room.
| Tool type or model | Weight in g | Packed size in cm | Cleaning effort | Fixed surface/water needed? | Hunting area | Vehicle | Processing room |
|---|---|---|---|---|---|---|---|
| Work Sharp Pocket Sharpener | about 45¹ | about 16.5 × 4.4 × 1.3¹ | Medium | Can be used dry; secure grip needed | Good with dry, clean hands | Good | Good for quick touch-ups |
| Work Sharp Guided Field Sharpener | Not clearly documented | Not clearly documented | Medium: multiple abrasive surfaces and leather | Can be used dry; a stable surface helps | Good | Good | Good with a separate sharpening area |
| Long ceramic or diamond rod | Depends on model, not documented | Depends on model, not documented | Low to medium | Needs secure support | Limited | Good with protected storage | Good |
| Rolling sharpener | Depends on model, not documented | Depends on model, not documented | Depends on model | Needs a stable, level work surface | Limited | Only with a suitable work surface | Good at a permanent workstation |
¹ Converted from manufacturer specifications, not measured independently.[58][59][60] Cleaning and suitability are editorial assessments. Unclear transport data is shown without figures.
In the field, your sharpener needs protection during transport. In the butchering area, its surface should be easy to clean. In your vehicle, long rods need to be stored securely; stationary systems need a stable base.[57][61]
Remove blood, fat, tissue residue, and metal filings with a disposable cloth or a suitable brush. For the Guided Field Sharpener, Work Sharp recommends brushing off the diamond plates and ceramic rod. Only parts explicitly labeled as washable may be cleaned with drinking water and a suitable cleaning agent, following the manufacturer's instructions. Then rinse off any residue. Wipe leather strops dry. Don't assume the parts are dishwasher-safe. Dry joints, screws, and removable parts completely.[57][61][63]
Store the sharpener in a dry place, separate from game meat. Before you continue working, make sure your knives and food-contact surfaces are free of sharpening dust and unsuitable care products.[57][62][63]
Conclusion: Choose a sharpener that suits where you'll use it
With budget sharpeners, price isn't the only thing that matters. What counts is how well the material removal, control, and portability suit your needs. If the edge is just rolled over, a smooth honing steel is enough. For dull blades or chips, you need abrasive sharpening.[67][69][71]
A good rule of thumb is 15–20° per side. But the factory angle and blade geometry take priority. Use light pressure, move the edge away from your body, and never test sharpness with your finger.[67][68]
The table will help you choose. It contains editorial assessments, not measurements. Weight and packed size depend on the model.[67][70]
| Tool type | Cutting performance | Angle control / steel removal | Weight and packed size | Maintenance | Where to use |
|---|---|---|---|---|---|
| Pull-through sharpener | Quick working sharpness | Fixed angle / sometimes aggressive | Small and lightweight | Low to medium | Hunting grounds |
| Ceramic rod | Fine touch-ups | Freehand / low | Slim, sometimes long | Low | Hunting grounds |
| Smooth honing steel | Maintains the edge | Freehand / very low | Usually elongated | Low | Butchering room |
| Pocket stone / diamond plate | High with practice | Freehand / depends on grit | Compact | Medium | Backpack |
| Rolling sharpener | High with a suitable blade | Fixed guide / depends on abrasive | Rather bulky | Medium | Butchering room |
| Guided system | High | High / depends on abrasive | Larger set | Medium to high | Fixed workstation |
For use in the field, pull-through sharpeners or ceramic rods are suitable. In your backpack, there's room for a diamond plate or a compact sharpening tool. In the butchering room, a guided system or rolling sharpener is an option. There's no single winner for every use.[67][68][70][72]
You can find suitable sharpeners and accessories at Gunfinder.
FAQs
How can I tell if honing is still enough?
If your knife still cuts but feels sluggish, honing is usually enough. You can test it with paper: if the blade still cuts fairly cleanly and only catches or tears slightly, honing with a steel or leather strop is generally sufficient.
Sharpening is necessary if the blade slips on tendons or skin, tears tissue, or you need to use significantly more force. Visible shiny spots or microchips along the edge are also signs.
What grit do I need for my hunting knife?
A combination of different grits is usually a good choice for your hunting knife. Use a 1,000-grit stone to sharpen the blade for everyday use. A 3,000-grit stone then gives it a finer edge.
For a heavily damaged or extremely dull blade, start with a coarse stone with a 220-grit rating. For an especially fine finish, you can use a stone with a grit rating of 6,000 to 8,000 as a final step.
How often should I sharpen my knife while butchering game?
Whether honing is enough depends on the condition of your edge. If the knife still cuts, regular honing is usually enough. But if the blade slips on skin or tendons, tears tissue instead of cutting it, or you need to use significantly more force, you need to sharpen it with a whetstone or ceramic rod.
The rule of thumb: If honing doesn't make a noticeable difference, realigning the edge is no longer enough. Then you need to rebuild the edge geometry with abrasives.