Achtung: Your browser is outdated. Please note that Gunfinder may not work properly in some places. You should update your browser as soon as possible. Learn more here!

Eemann Tech Aluminum Red Dot Mount for 1911/2011 Bomar Cut (Type: V1)

≈ $93
Price at the dealer: 920 kr. Converted at the ECB rate as of November 06, 2026.
No permit required (18+)
288 33 Vinslöv, Sweden
0
ID: 11510448
Purchase from outside the EU: The firearm goes through an importer in your country, the dealer handles the export. How buying from Europe works
Shop safely with Gunfinder
Our AI-powered seller identity verification makes Gunfinder the safest marketplace online. Learn more
About the seller
Vinslövs Vapen
Dealer

Details

Original language
Swedish
Category
Condition
New
Location
🇸🇪 288 33 Vinslöv, Sweden
Availability
In stock

Freshness

This listing is based on a mirrored offer, where the listing data was synced to us from a shop, dealer, or external marketplace. Please note that temporary price discrepancies may occur due to possible delays in data transmission.
Source
Vinslövs Vapen
Last checked with the dealer
about one hour ago

Description

Note: The item is located abroad. Please note that delivery conditions, shipping times, and/or the purchase process may differ.
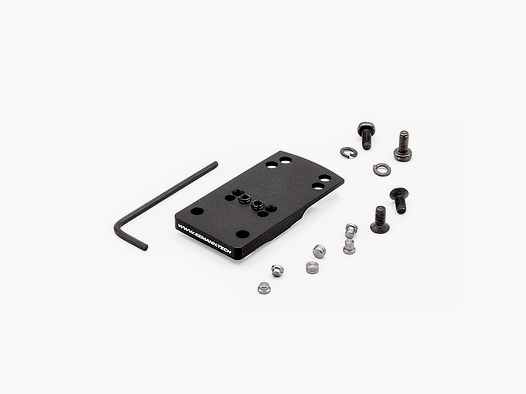
Eemann Tech Aluminium Red Dot Mount for 1911/2011 Bomar-Cut SlidesEngineered for precision and reliability, the Eemann Tech Red Dot Mount offers a solid, lightweight mounting solution for red dot optics on 1911/2011 pistols with Bomar-cut slides. Constructed from robust 7075 T6 aluminum and weighing just 15 g, it maintains perfect alignment under demanding shooting conditions. Choose between Type V1 and V2 kits, each including all required screws, hex keys, and locator pins for a wide range of red dot models.Specification:Material: Aluminium Alloy 7075 T6Weight: 15 gColor: BlackFits: Bomar-cut 1911/2011 slidesOptional Installation Tool: ET-130010 (sold separately)Type V1 – ET-111901 Includes:Red Dot Mount – V1 (1 pc.)Hex Socket Set Screws – ET-131008 (2 pcs.)Hex Key 2 mm L-shape – ET-030013 (1 pc.)Locator Pins:V1C – ET-130881 (2 pcs.)V1A – ET-130882 (2 pcs.)V1E – ET-130883 (2 pcs.)Spare Screws & Lock Washers:For Vortex Venom – ET-130888 (2 pcs.)T15 Screws for Vector Optics – ET-130891 (2 pcs.)Compatible With (V1):Vortex Venom & ViperBurris FastFireSIG Romeo 1Vector Optics SCRD-35/40 & TEK footprintsDocter® Sight II PlusShield Sights SMS/RMSType V2 – ET-111902 Includes:Red Dot Mount – V2 (1 pc.)Locator Pins:V2B – ET-130884 (2 pcs.)V2D – ET-130885 (2 pcs.)V2F – ET-130886 (2 pcs.)Hex Keys:1.5 mm L-shape – ET-030012 (1 pc.)3 mm L-shape – ET-030015 (1 pc.)Hex Socket Slide Lock Screws – ET-130887 (2 pcs.)Spare Screws:M4×10 – ET-130890 (2 pcs.)M4×12 – ET-130892 (2 pcs.)T15 Screws for Holosun – ET-130891 (2 pcs.)Compatible With (V2):C-More RTS2/STS2/RTS3Benthley TSX6 & MOJ footprintsVortex RazorSIG Sauer Romeo 3Trijicon RMRKahles Helia RD 20018/20019Holosun HS507C/HS507Comp/HE508T/HS407CVector Optics SCRD-36/37/59Installation InstructionsPrepare & Safety:Clean work area, wear safety glasses and gloves.Keep a parts tray to avoid losing small screws or pins.Unload & Inspect:Remove magazine and rack slide back.Visually & physically inspect chamber—confirm no round is present.Disassemble Slide:Lock slide open, push out slide-stop lever.Remove slide assembly from frame.Remove guide rod, recoil spring, and barrel.Remove Factory Rear Sight:Secure slide in padded vise.Use a dovetail sight pusher aligned to the rear sight wings.Apply even pressure until sight slides out.Mount Red Dot Base:Note directional arrow on mount base—align toward muzzle.Place mount into Bomar-cut dovetail at slight rearward angle.Use ET-130010 installation tool or brass punch to tap gently.Seat fully until flush, checking alignment from above.Insert Locator Pins:Select pins matching your red dot footprint.Press pins into mount’s pin holes until they click flush.Attach Red Dot Optic:Place optic on mount, aligning holes to pins.Insert manufacturer screws—start each by hand.Tighten in criss-cross pattern to 6-10 in-lb torque (check your optic’s spec).Apply medium-strength thread locker to threads before final torque.Reassemble & Function Check:Reinstall barrel, spring, and guide rod.Reattach slide to frame; cycle action to ensure smooth operation.Zero Your Optic:At 10 yds begin with bore light or bore sighting to get on paper.Fire group of three, adjust windage/elevation per click value.Confirm at your preferred zero distance (e.g., 25 yds).Record settings for future reference.

Similar listings