Recognize 8 defects in used UTVs

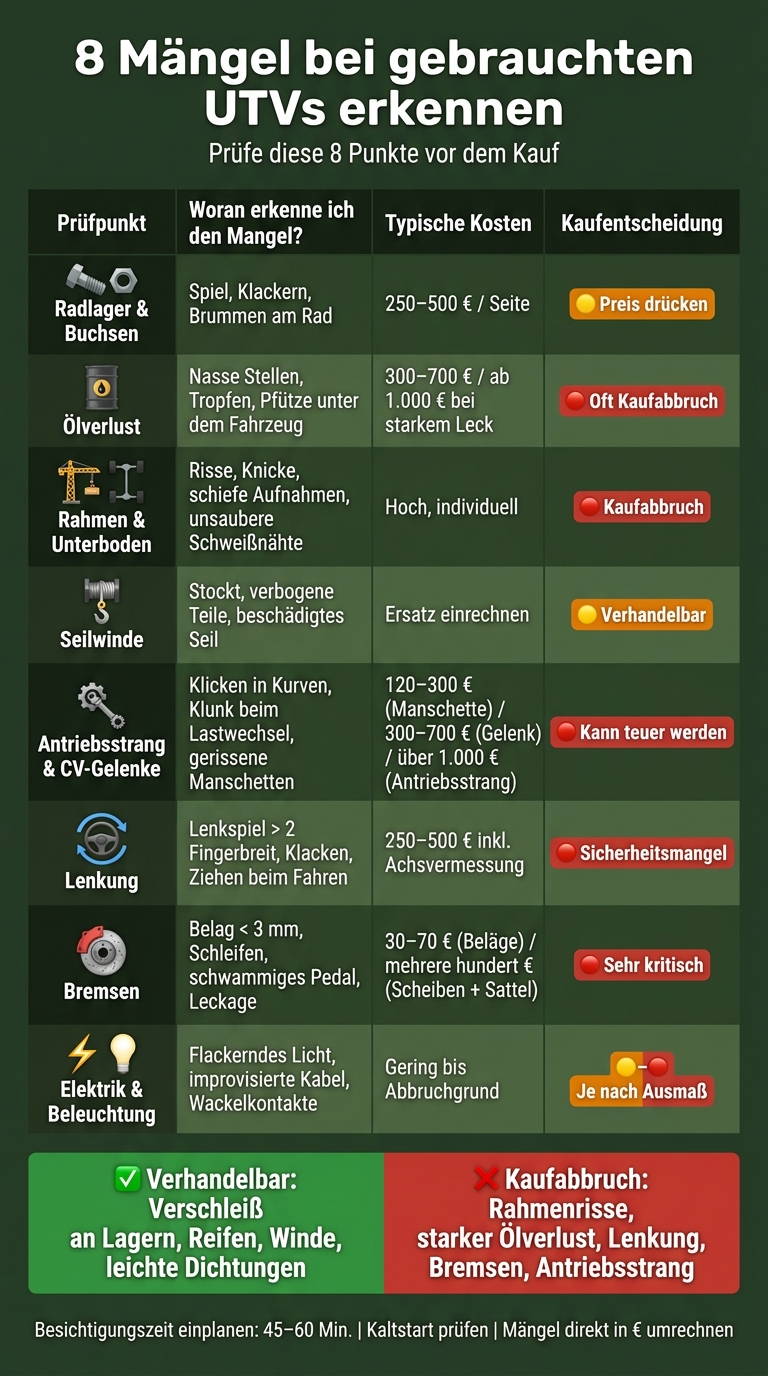
A used UTV can look good at first glance – but it usually gets expensive underneath. Before buying, I mainly focus on 8 points: wheel bearings and bushings, oil leaks, frame and underbody, winch, drive shafts and CV joints, steering, brakes, and electrical system.
When I inspect a UTV, I plan 45 to 60 minutes, check the cold start, and immediately convert defects into euros. Because even small defects can add up: wheel bearings often 250 to 500 € per side, brakes often several hundred euros, severe leaks sometimes from 1,000 €.
Here’s what matters to me right away:
- Play, clicking, or humming at wheels, steering, or drivetrain
- Oil traces, drops, or puddles on engine, transmission, and differential
- Cracks, bends, or weld spots on the frame
- Damage to winch, cable, and mount
- Torn boots and grease on the rims
- Spongy brake pedal or pulling when braking
- Flickering lights or poor cable repairs
- Multiple defects at once in safety-critical areas
My quick rule: Wear is often negotiable. Frame, brake, steering, and severe drivetrain damage are often reasons to walk away.
| Check Point | How I Often Notice the Defect | My Initial Assessment |
|---|---|---|
| Wheel Bearings & Bushings | Play, clicking, humming | Lower price or replace |
| Oil Leak | Wet spots, drops, puddle | Often walk away if severe leak |
| Frame & Underbody | Cracks, bends, crooked mounts | Usually deal breaker |
| Winch | Stutters, bent parts, bad cable | Factor in replacement cost |
| Drivetrain & CV Joints | Clicking in turns, clunk on load change | Can get expensive |
| Steering | Steering play, clicking, pulling | Safety issue |
| Brakes | Low pad, dragging, spongy pedal | Very critical |
| Electrical | Flickering, loose connections, exposed wires | From minor to deal breaker |
If I check these points thoroughly, I buy based on technical condition, not just clean paint.
8 Mängel beim Gebrauchten UTV: Checkliste & Reparaturkosten
Repairs & Condition of the 2-Year-Old Can Am Traxter XU HD10 Car Wrapping Defender
sbb-itb-1cfd233
Before the Viewing: How to Prepare Yourself
Arrange the appointment in daylight, preferably on a dry day. Rain can simply hide oil traces and moisture at plug connections. Also, take 45 to 60 minutes so you don’t have to rush.
The cold start is the first big check during the inspection itself. Ask the seller to have the UTV cold and not yet started ready. That’s exactly when starting problems, rough idling, and smoke development become noticeable – things that are often hardly visible with a warm engine.
Place the UTV on a level, firm surface. Only then can you see if it’s leaning or if any fluids are leaking.
You don’t need much for this:
- Flashlight
- Work gloves for sharp edges and oily spots
- Smartphone
- optionally a tire pressure gauge
A tire pressure gauge can be especially useful. Uneven pressure is immediately noticeable – and that can mask faults in steering or suspension.
Think in euros from the start. A wheel bearing quickly costs 150 to 400 € per axle, brakes often run between 250 to 500 €. This way you can directly translate defects into possible repair costs and better assess the price. Then first check the suspension and bearings, because hard use usually shows its marks there first.
1. Worn-Out Wheel Bearings and Suspension Bushings
Wheel bearings at front and rear wheel hubs often wear out quickly. Suspension bushings on control arms, trailing arms, and stabilizer mounts especially take a beating from mud, water, and hard impacts off-road.
First look at the wheel hubs, then the suspension bushings. With the vehicle jacked up and secured, grab the wheel at 12 and 6 o’clock and shake it vigorously. Noticeable play or a clicking noise is a clear sign of a worn wheel bearing.[3] Then turn the wheel by hand. A good bearing runs smoothly, a defective one grinds, rattles, or hums.[3]
During the test drive, a bearing damage usually shows itself through a steady humming or whining that gets louder with speed and changes when you steer slightly.[3] Defective bushings are noticeable differently: more like a dull knocking over individual bumps or potholes, often already at about 5 to 10 km/h.[7][9]
When stationary, you can often see worn bushings directly. Look for cracks in the rubber, pushed-out material, or displaced metal sleeves. With slight levering, you can usually quickly check for play.[2][4][11]
Both points are safety-relevant. A broken wheel bearing can get hot, seize, or in the worst case, loosen the wheel hub.[10] Worn bushings worsen tracking and driving stability.[6][8] In short: play, humming, or knocking are clear warning signs. Then you should negotiate the price down or better move on.
For the costs, you can roughly expect the following:
2. Oil leak at engine, transmission, and differentials
After play and bearing noises, you next check the seals. Oil leaks are often an early sign of the next expensive defect.
Typical leak points are at seals and oil seals of the engine, transmission, and differentials.
Grab a bright cloth, shine under the vehicle, and check the affected areas before and after the test drive. A look at the parking spot is also worthwhile.[14][16][17]
A light oil film without drops is usually just sweating. It’s different with wet spots, drops, or even a puddle. Then it’s a real leak.[13][17]
The more oil leaks, the less the purchase price matches the later repair costs.[14][1][15][16]
| Severity | Appearance | Typical Repair Costs |
|---|---|---|
| Light sweating | Oil film, dirt sticks, no drops | rather low, often deferrable |
| Moderate leak | Wet spots, occasional drops | approx. €300–700 |
| Severe leak | Constant drops, oil puddle, significant loss | from €1,000 upwards |
With a severe leak, you should get a cost estimate from the workshop before buying and factor the amount directly into the price negotiation.
3. Underbody and Frame Damage
After checking for oil loss, now look at the frame and underbody. That’s often where hard impacts show first.
Especially important are the longitudinal and cross members, the mounts for suspension and shock absorbers, as well as the skid plates. Typical damage most often appears at these points.
For inspection, a bright LED flashlight and a small mirror are enough. Ask the seller to park the vehicle on firm, level ground and clean the underbody beforehand. Then walk along the frame on both sides from front to back and carefully feel suspicious spots with your hand. A magnet helps quickly find putty spots.
Serious damage is recognizable by bends, cracks, warped holes, and fresh welds that visually don’t match the rest. Always compare left and right sides. If contours or angles differ, that often indicates a bend.
A bent or cracked frame is a clear reason to cancel the purchase. It affects driving stability and safety. Additionally: Poor repairs can cost the operating permit. In such a case, you can usually skip further inspection.
| Finding | Assessment | Recommendation |
|---|---|---|
| Scratches and paint chips on skid plates | Normal wear | Acceptable, check price |
| Single, neatly done weld repair with workshop invoice | Moderate damage | Negotiable, lower price |
| Bends in longitudinal members, cracks at suspension mounts, sloppy welds | Structural damage | Cancel purchase |
If frame and underbody are unremarkable, next is the winch. Overload and heavy use often show up quickly here.
4. Defective or overloaded winch
If underbody and frame are unremarkable, now it’s time for the winch. It often becomes clear pretty quickly whether it was just used or already heavily stressed.
First, check the cable over 3 to 5 m length. For steel cable, watch for kinks, spread strands, and rust. For synthetic cable, look for fraying, cuts, flat spots, and heat damage. If the cable visibly thins or two adjacent strands are cut, it must be replaced.
Then check the hook, cable window, and mount. A bent hook, a broken safety latch, deep grooves in the cable window, or a crooked drum indicate overload or angled pull. Bent mounts, cracks on the mounting plate, or missing screws are clear warning signs.
Next comes the test run. Only then do you notice if only the cable suffered or if the electrical system is already causing trouble.
Test the winch with the ignition on and let it run forward and backward. It should start immediately, pull evenly, and operate without clicking or grinding. If it runs sluggishly, stalls, or only starts after several attempts, this indicates corrosion, poor contacts, a weak relay, or a worn motor.
| Finding | Recommendation |
|---|---|
| Light fraying, otherwise smooth operation | Plan for cable cost, negotiable |
| Slow, jerky, or with bent parts | Factor in full replacement or cancel purchase |
5. Play in drivetrain and CV joints
Next up is the drivetrain. Play in shafts and CV joints can quickly get expensive. So now you especially watch for noises, play, and the condition of the boots.
Check for noises: Drive the UTV slowly on a flat surface. Then turn fully left and fully right once. A rhythmic clicking or popping often indicates a worn outer CV joint. [23][24][25] Then switch several times between forward and reverse driving. A distinct clunk is a warning sign of play in the drivetrain. [25][26]
Check axle boots: Look closely at all four corners. Longitudinal cracks in the folds, holes, loose clamps, or grease splatters on the rim or control arm are clear signs of trouble. [18][22][24] If the rubber boot feels hard instead of elastic, it is often near the end of its life, even if no crack is visible yet. A torn boot counts as a major defect in the German main inspection. You won’t get the sticker then. [18][20][21]
Feel for play: With the vehicle parked, grab the drive shaft right next to the CV joint and check for axial and radial play. Noticeable tilt or rotational play, combined with noises while driving, is a clear warning sign.
| Finding | Assessment | Typical costs (DE) |
|---|---|---|
| Torn axle boot, no noises yet | Replace boot, check joint | approx. €120–300 per side [20] |
| Clicking in tight curves, boot damaged | Joint probably already worn | approx. 300–700 € per shaft [18][20] |
| Strong clunk when changing load | Drivetrain or differential affected | possibly several hundred up to over 1,000 € [19] |
Clear clicking in tight curves or a strong clunk when changing load is not a small issue. In such a case, you should clearly push the price down or better move on.
6. Steering wear and play
After the drivetrain comes the steering. If something is wrong here, you often notice very quickly how precise or imprecise the front axle works. Typical problem areas are tie rod ends, ball joints, and the rack and pinion steering. As soon as wear occurs there, the front axle becomes inaccurate and the car drives unstable.
Check steering play while stationary: Let the engine run; with vehicles with electric power steering this is mandatory. Set the wheels straight and move the steering wheel slightly left and right without the wheels turning yet. If the steering wheel can be moved a good bit before the wheels react, the steering play is too large. As a rough rule of thumb: more than one to two finger widths of steering wheel movement without wheel movement is too much. [32]
Check wheels by hand: Jack up the front axle and test each wheel individually. Move the wheel vigorously at 3 and 9 o’clock. Noticeable play or an audible clicking often indicates worn tie rod ends. [27][28][29] Then repeat the test at 6 and 12 o’clock. Play in this direction rather indicates worn ball joints. [27][29] A good trick: Grab the respective joint with your hand at the same time. If you feel movement or clicking directly there, the part is due.
Also take a close look at the dust boots on tie rod ends and ball joints. Cracks, swollen rubber, or missing clamps are clear warning signs. Dirt and water have often already gotten in. [30][31][37] Such joints are often already worn, even if no play is yet noticeable.
| Finding | Assessment | Typical Costs (DE) |
|---|---|---|
| Slight play, boots intact | Check tie rod ends for play and replace if necessary | approx. €250–500 incl. axle alignment [33][34][35][36] |
| Clacking at 3/9 o’clock, torn boot | Tie rod end worn, replace immediately | usually in the low to mid three-digit range |
| Play in steering wheel + clacking + pulling | Multiple components affected (rack and pinion steering, tie rods, possibly ball joints) | can get expensive quickly |
Significant steering play combined with noises or unevenly worn front tires is not a minor defect. If steering and front tires are already noticeable, you should next check the brakes especially carefully.
7. Brake System: Wear and Defects
After steering play, it’s time for the brakes. Here you immediately notice how safe the UTV ultimately drives. And honestly: there’s no room for compromise here. Brakes are safety-relevant, and especially off-road, pads, lines, and calipers often wear out sooner.
During the visual inspection while stationary, turn the wheels fully and shine a flashlight through the opening in the brake caliper. This way you can see the pad between the carrier plate and the disc. If the remaining pad thickness is below about 2–3 mm, you should replace the pads soon. At the same time, take a look at the brake disc. Deep grooves, a clearly noticeable lip on the outer edge, or bluish discoloration indicate heavy wear or heat problems. A light layer of rust after a short standstill is normal and not a problem at first.
Then check the lines, calipers, and brake fluid. Inspect all rubber lines for cracks, swelling, and chafing. Follow the metal lines along the frame and watch for rust or wet spots. Fluid traces on brake calipers, line connections, or the master cylinder are a clear warning sign. The brake fluid reservoir also says a lot: the level should be between “MIN” and “MAX,” and the fluid should be clear to slightly yellowish. If it’s dark brown or cloudy, the system usually hasn’t been serviced for a long time.
If the UTV has a parking brake, check it directly. It should hold the vehicle securely on level ground and not only engage when you pull or push hard.
During the pedal test before the test drive, keep the engine off. Pump the brake pedal several times until it becomes firm, then hold steady pressure for 30 seconds. If the pedal slowly sinks during this time, there is usually a leak—either externally on a line or internally in the master cylinder. If the pedal feels spongy and only firms up after several pumps, there is often air in the system.
On the test drive, brake evenly several times from about 20–30 km/h. The UTV should decelerate cleanly, straight, and without drama. It should not pull to one side, judder, or grind metallically. If it pulls left or right when braking, a caliper is often stuck or a pad is worn unevenly. Metallic grinding often means: pad gone, rotor damaged as well. If you feel pulsation in the pedal, the rotors may be warped.
| Finding | Assessment | Typical Costs in Germany |
|---|---|---|
| Pad < 3 mm, rotor still smooth | Replace pads soon, check rotors | approx. €30–70 per axle for pads |
| Deep grooves / heat discoloration on rotor | Replace rotors and pads | several hundred euros |
| Spongy pedal, air in system | Bleed system and find leak | several hundred euros |
| Visible leak on caliper or line | Safety issue, immediate action required | Caliper approx. €100–250, master cylinder approx. €120–300 |
If several of these defects occur together, that’s a clear reason for a price reduction—or to skip the purchase altogether. For leaks, spongy pedals, or heavy wear: negotiate the price or keep looking. If brakes and pedal are unremarkable, move on to the electrical system.
8. Electrical System and Lighting
Electrical problems often only show up when the system is under load or the vehicle is shaken. Still, you can find out a lot with a quick check during the inspection.
Turn on the ignition and go through all the lighting functions once: low beam, high beam, turn signals, hazard lights, brake light, and reverse light. Everything should respond immediately and shine evenly bright. If the lights flicker or visibly dim, the charging system is often the cause.
Then you check battery and charging system. The terminals should be clean and tight. At rest, 12.4 to 12.7 V is normal, with the engine running 13.5 to 14.5 V.[38] If the voltage stays too low or drops under load, for example when lights and winch run simultaneously, this indicates a weak charging system. Also ask about the battery’s age. A battery several years old that has often been deeply discharged is much more likely to fail.
Test every switch several times. If a switch only responds after repeated pressing, it usually indicates moisture or wear. You should only accept additional consumers if the fuse is properly installed and the cables are neatly routed. Cables connected directly to the battery without their own fuse are a fire hazard. This is no small matter.
Finally, take a close look at the wiring harness: under the dashboard, on the frame braces, and under the seats. Chafing spots, twisted wires with electrical tape, or open connectors are clear warning signs. You can often recognize corrosion by whitish-green deposits on connectors and ground points. Especially with moisture or vibrations, such spots often cause failures.
| Finding | Assessment |
|---|---|
| Single bulb defective, slight corrosion | Normal wear, easy to fix |
| Flickering light, voltage does not rise with engine running | Have charging system checked |
| Switch does not respond or only with flicker | Worn contacts or moisture damage |
| Many improvised cable repairs, several blown fuses | Potential deal breaker, safety risk |
If several of these points come together, a small defect quickly becomes a reason to walk away from the purchase.
When wear becomes a deal breaker
After the individual checks, only one thing counts in the end: the overall balance. After the visual inspection, you have to make a clear decision: repairable or too risky. Not every defect weighs the same. In the end, it’s about whether the damage can be fixed with reasonable effort or if it directly affects safety.
Scratches and dents are usually just bargaining chips. Cracks in welds, a bent frame, or welding work on load-bearing parts, on the other hand, are a clear reason to cancel the purchase.
With typical wear parts, you can negotiate. With structural damage or safety-critical defects, you should walk away. The closer a defect is to steering, brakes, frame, or drivetrain, the faster a negotiation turns into a no. If a UTV shows issues in several safety-relevant areas – for example, heavy steering play combined with oil leaks at the differential and play in the drivetrain – repair costs often add up so much that any price reduction immediately evaporates.
This overview helps you with the final decision right on site:
| Finding | Usually manageable | Critical risk | Purchase decision |
|---|---|---|---|
| Scratches and dents | ✓ | – | Negotiate |
| Slight bearing play, worn tires | ✓ | – | Price reduction |
| Leaking seal without active drip loss | ✓ | – | Price reduction |
| Severe oil loss on engine, transmission, or differential | – | ✓ | Cancel purchase |
| Cracks, bends, or weld patches on the frame | – | ✓ | Cancel purchase |
| Bent A-arms, crooked suspension points | – | ✓ | Cancel purchase |
| Loud cracking from differential or shafts under load | – | ✓ | Cancel purchase |
| Excessive play in steering, vehicle pulls clearly to one side | – | ✓ | Cancel purchase |
| Spongy brake pedal, noticeably long braking distance | – | ✓ | Cancel purchase |
| Many improvised cable repairs | – | ✓ | Cancel purchase |
If the seller refuses a test drive or maintenance records are missing, that alone is a warning sign. Then the good first impression no longer counts, only the overall technical condition. If the technology checks out in the end, the next step is the question of which used UTV is actually sensible for hunting in Germany.
Used UTVs for Hunting in Germany
Once the technical defects are checked, one thing becomes clear about the UTV for hunting: how hard it was worked in the field.
Anyone looking for a used UTV for hunting starts with different standards than someone who wants a vehicle for leisure. In the field, the paint doesn’t matter. What counts is whether the UTV handles baiting runs, game recovery, and driven hunts without fuss. This kind of use often causes more wear on the suspension, underbody, drivetrain, and electronics.
Field vehicles usually reveal their daily use quite openly. Often you can see the wear on the underbody, the winch, and attachments for game recovery or transport. That’s worth a close look. A few scratches are usually no big deal. But heavy signs of bottoming out, bent parts, or sloppy retrofits are a warning sign.
During the inspection, you should also check whether registration, lighting, indicators, and mirrors fit your planned hunting use. That may sound like small stuff at first, but it can later cost time, money, and nerves.
If the UTV is technically sound, the next step is only about the overall condition in relation to the price. Then the only question left is whether condition and price match in the end.
Conclusion
If you check these eight points, you don’t just buy based on feeling. Bearings, oil loss, underbody, winch, drivetrain, steering, brakes, and electronics clearly show how well a used UTV is maintained.
Scratches, slightly worn seats, and lightly worn tires are usually no big deal. It gets tricky when several safety-relevant areas at once have problems or when repairs can quickly cost several hundred to over 1,000 €. Individual defects that can be clearly limited are often okay—as long as that is reflected in the price.
If defects in drivetrain, suspension, and brakes accumulate at the same time, that’s a clear sign to reconsider the purchase calmly.
With this checklist, you make informed decisions when buying a used UTV on Gunfinder.
FAQs
Which defects are real deal-breakers for purchase?
Deal-breakers are defects that endanger safety, reliability, or legal integrity. These mainly include:
- active rust
- Cracks on load-bearing parts
- sticking mechanics or defective safety mechanisms
- missing proof marks or inconsistencies in the documents
Damage to the muzzle crown or corrosion scars in the barrel are also critical. If you're unsure, it's better to consult a gunsmith.
How do I recognize hidden damage during the test drive?
During the test drive, pay attention to unusual noises, vibrations, and how the UTV drives directly. Test the drivetrain under load changes and watch closely whether the vehicle stays cleanly in its lane or shows abnormalities when shifting.
Then check the underbody, drivetrain, and all connections again for play, oil leaks, and unusual wear. Also check whether the winch and other functions work perfectly.
Which defects are good for negotiation?
Especially cosmetic or purely functional defects that can be fixed within a manageable scope are good for negotiation. These include light corrosion, superficial damage to metal parts, as well as small dents or scratches.
Such defects reduce the value without usually directly affecting safety. That’s exactly why they are good starting points for price talks. So look very closely at these visible weaknesses during the inspection.